Configuring CTid-enabled sensors
What is CTid?
CTid is a technology created by eGauge which allows the eGauge meter to obtain information about a connected CT or Sensor. This information can include model, manufacturer, serial number, amperage rating (if CT), and other information about the sensor. The information is stored on a chip embedded in the CT or Sensor, and can only be read by EG4xxx model units (eGauge Core and eGauge Pro). When inputs are scanned for CTid sensors, they are automatically configured instead of the user's traditional drop-down selection box.
CTid enabled sensors also contain a locator LED that can be blinked from the eGauge configuration interface. This can be used to identify which sensor is connected to which port, in the event the leads were switched or untraceable.
The CTid LED is OFF unless temporarily activated through the CTid configuration page in the meter interface.
Prerequisites
If you are not familiar with programming the eGauge, please refer to the overview help page and ensure access and permissions to configure the eGauge before continuing.
Ensure the sensors and Sensor Hub are installed correctly before continuing.
Configuring CTid Sensors
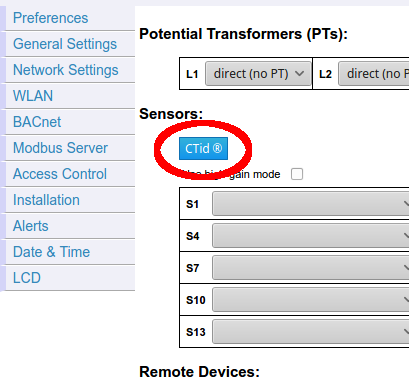
To configure a CTid-enabled sensor, navigate to the Installation Settings page (Settings -> Installation). Locate the blue "CTid" above the sensor drop-down menus:
Next, select the sensor ports that have CTid-enabled sensors connected, and press "Scan Checked Sensors":
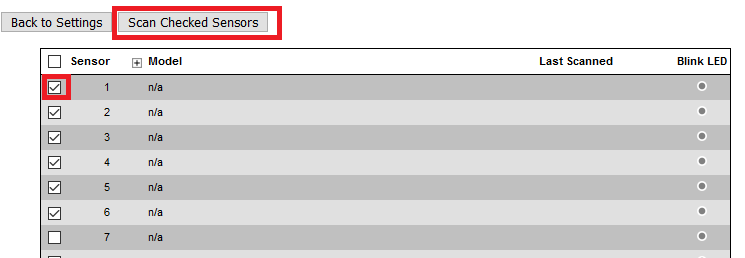
A green check-mark will show for each successfully detected sensor. The model and serial number is displayed for each sensor. Press the plus or minus sign (1) to expand or collapse additional information for the sensor. Every CTid sensor has an LED, which can be blinked by clicking the "Blink LED" button (2). To delete a configured sensor, press the "x" button (3). When finished, press "Back to Settings" to the left of the "Scan" button:

In the above image, an ambient temperature sensor (ETLW) is connected to Sensor port 1. Port 2 contains a temperature probe sensor (ETN100), port 3 contains a pulse sensor (EPS), port 4 contains a low voltage or dry contact sensor (ELV2), port 5 contains a Rope CT (ERA-1206-2775) and port 6 contains a split-core CT (ECS20 20mm 100A).
The CTid blink LED function can also be activated via the LCD menu by choosing Tools > CTid. Move the toggle switch to choose which port to blink, then press the toggle switch to begin blinking the port. Press the toggle switch again to stop the blinking function.
Back in the Installation Settings page, the inputs will show the sensor detected in blue to indicate it was programmed via CTid:

Finally, configure registers to record the data from these sensors:
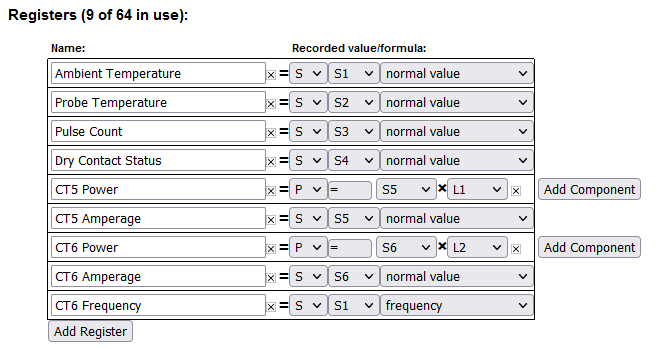
Choosing "S" (Sensor) for the type will record the value of the sensor. Temperature sensors record °C, pulse counts are unit-less, dry contact (low voltage sensor) records voltage and CTs record amperage.
To record power, use "P" (Power) and choose the CT input (S5 iand S6 n this example) and the voltage line it is on.
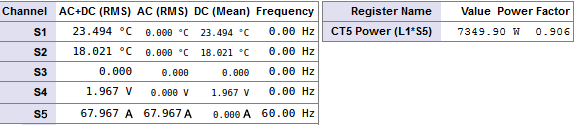
Instantaneous values may be found in the channel checker: