
How do I pair the eGauge with a HomePlug adapter?
Overview
By default all HomePlug-compliant PLC devices use the same encryption key - this means that, out of the box, any HomePlug-compliant device should be able to connect to any other HomePlug-compliant device without any adjustments. However, if there are multiple HomePlug adapters in the same location, or if there are security concerns regarding PLC traffic, it may be necessary to pair an eGauge with its HomePlug adapter. This is typically not required for most installations.
This article has instructions for pairing eGauge devices with their respective HomePlug adapters. Also included are instructions to rescue an "orphaned" device (that is, an eGauge or HomePlug with an unknown encryption key). These steps typically cannot be performed remotely, and require physical access to both the eGauge meter and the HomePlug.
In new installations, pairing is optional but not required. The eGauge and HomePlug adapter should communicate out of the box. If they do not communicate, there is likely a distance or installation issue; pairing will not correct these issues.
The internal HomePlug MAC address may be different than the MAC address printed on the meter label. For pairing EG4xxx meters, use a MAC address one higher than the one printed on the label. The MAC address on the label is what the LAN will see; the "internal" address that is one higher is used on the powerline network.
Contents
What is HomePlug and how is it used?
Technical And Environmental Considerations
How Secure is HomePlug Communication?
Changing the HomePlug Encryption Key (pairing)
HomePlug Adapter Push Button Timing
Pairing through the eGauge user interface
HomePlug Basics
What is HomePlug and how is it used?
HomePlug is a Power Line Communications (PLC) specification used to transmit networking data over standard power lines. Thus, all HomePlug devices are PLC devices, but not all PLC devices use HomePlug. It is commonly used to create a network bridge in a location where Wi-Fi can not work or is not convenient. Think of the HomePlug adapter as a "translator" that can convert an Ethernet signal into a form which can be sent over existing power lines, and vice versa. HomePlug adapters may commonly be referred to as "HomePlugs", although this can be confusing.
HomePlug adapters are commonly mistaken for wireless (WiFi) devices. Standard HomePlug adapters have no wireless component. A physical connection to an outlet and a router (via Ethernet) is required.
Typically, one HomePlug adapter is connected to a router with Internet access, and another is placed elsewhere in the building so Ethernet-capable network devices may connect to it. eGauge meters have a built-in HomePlug adapter, so only one HomePlug adapter is required when using an eGauge. Examples of common HomePlug adapters are shown below:
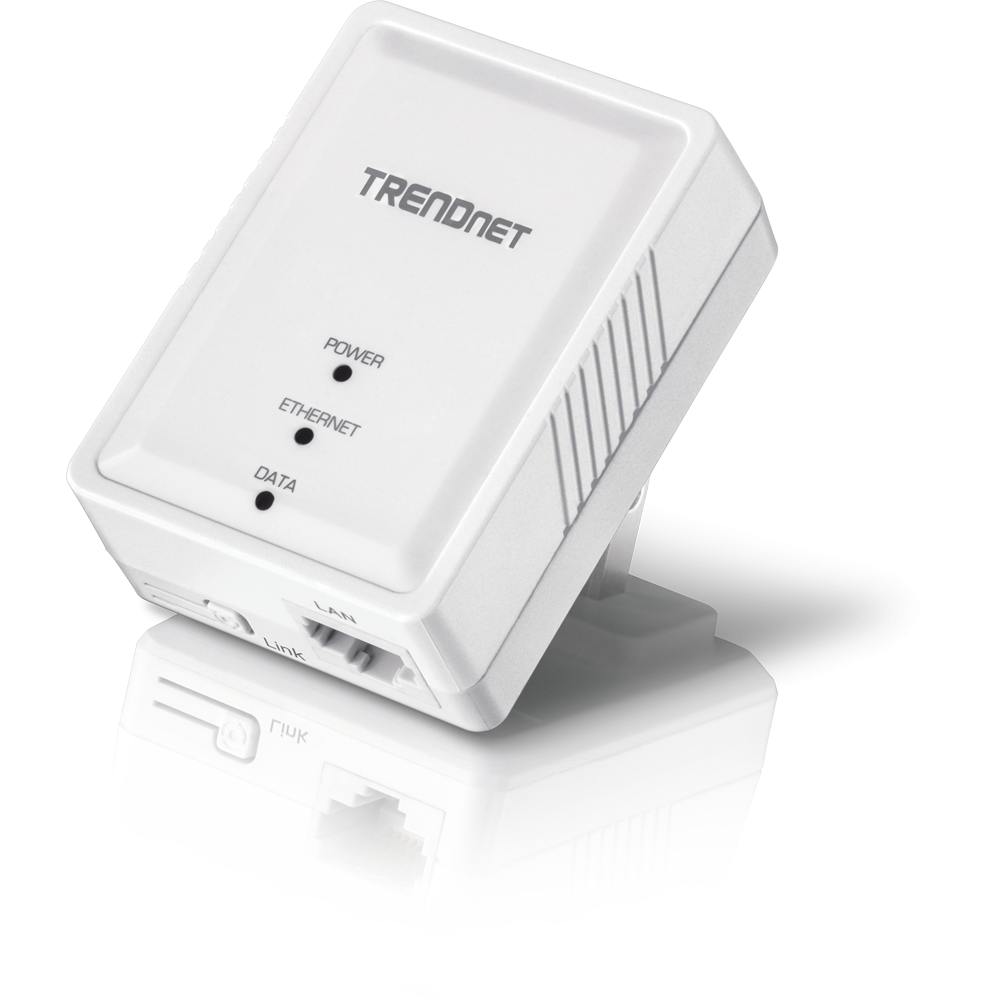
TRENDNet TPL-406E
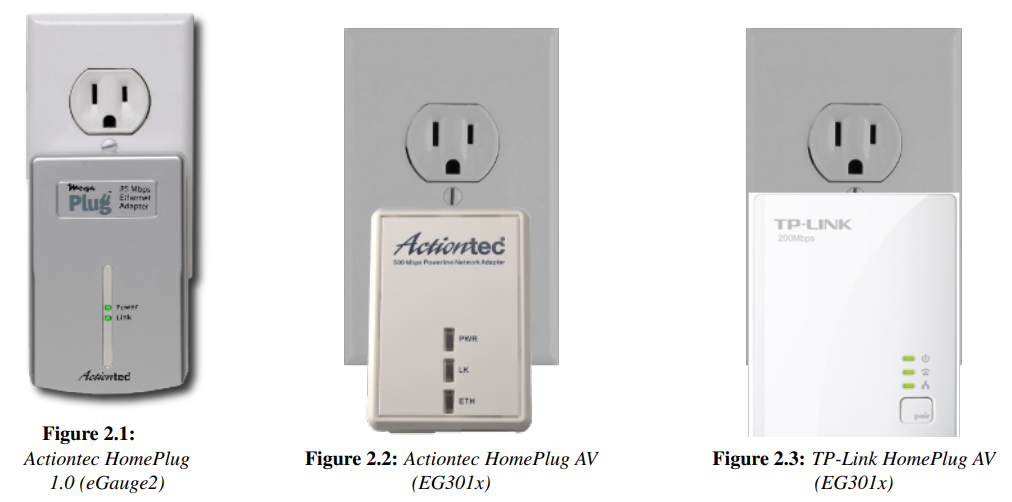
Older (legacy) HomePlug adapters. No longer available through eGauge but may be used at older sites.
Technical And Environmental Considerations
Phasing - HomePlug communication travels along the phase connected to L1 of the eGauge. The HomePlug adapter must be plugged into an outlet on the same phase as L1. Connecting the HomePlug to the wrong phase can cause issues with communication speed and quality.
Signal Deterioration and Loss - HomePlug signals can be filtered out by surge suppressors and noise filters, and will deteriorate as the length of wire between the eGauge unit and HomePlug outlet increases. This article covers several potential causes for HomePlug communication issues.
Voltage Limitations - The HomePlug AV adapters sold by eGauge Systems LLC are rated for voltages up to 240Vac (50 or 60Hz).
Although it is not recommended, eGauge Systems LLC stocks a powered enclosure kit for 277V/480V services which will step down 277Vac down to 120Vac. The transformer is rated at 25VA , suitable for powering several small devices with a combined load < 25VA. Please see this page for more information.
Multiple HomePlugs on a Network - A single HomePlug adapter can support up to 16 HomePlug devices (eGauge meters) under ideal conditions. Communication may be affected above that limit.
Issues can arise if there are multiple HomePlug adapters connected to the same network. For example, if two eGauge meters and two HomePlugs are connected to the same network, a network loop may occur. The solution is to pair each meter with a specific HomePlug adapter.
How Secure is HomePlug Communication?
EG4xxx and EG301x models use the HomePlug Green PHY specification and are compatible with devices using the HomePlug AV standard. This standard uses 128-bit AES encryption.
eGauge2 models use the HomePlug 1.0 specification and are compatible with devices using the HomePlug 1.0 standard. This standard uses 56-bit DES encryption.
HomePlug 1.0 compliant adapters are considered obsolete, and are no longer sold directly by eGauge Systems. Replacing eGauge2 meters is recommended. This article has more information.
The range of a HomePlug signal is usually restricted to a single building. More specifically, most utility transformers will completely filter the HomePlug signal. For this reason, there is little risk of a third party intercepting HomePlug communication. Furthermore, due to the nature of the HomePlug standard, even if the HomePlug signal were detectable it would be exceptionally difficult for a third-party device to interpret the point-to-point traffic between two HomePlug devices. Therefore, for most owners of HomePlug devices, privacy of communication is assured without any further steps.
Even if a neighbor could pick up the HomePlug signal, any traffic other than broadcast traffic is difficult to snoop on because the transmission-characteristics of power-lines is so poor that, in practice, communication between any pair of devices cannot be picked up by a third device. In other words, the worst that could happen in such a scenario is that the neighbor could pick up some broadcast traffic or could use your Internet connection for their own purposes.
For extra security and when using HomePlug devices in an apartment or condo or where multiple residences may be powered by a single transformer, it is possible to set a new encryption key to "pair" HomePlug devices. The default key can be changed under Settings -> HomePlug (all models) or by using push-button pairing (some models).
HomePlug 1.0 devices use the default key HomePlug
HomePlug AV devices use the default key HomePlugAV
Changing the HomePlug Encryption Key (pairing)
All HomePlug AV devices (including the eGauge meter) ship with the same default encryption key, meaning all HomePlug AV devices can pair with one another out of the box. However, it may be desirable to pair a specific eGauge and HomePlug adapter (eg, to prevent network loops or increase security). Once paired, the eGauge and HomePlug will only see one another, and will not be able to communicate with other HomePlug AV devices. The method to enter pairing depends on the meter model.
Push Button Method (EG301x meters)
EG301x meters feature push button pairing. With this option, the eGauge and a HomePlug can be paired without network access to the meter.
Physical access to the eGauge meter is required. Depending on the installation, there may be a risk of electric shock.
EG301x meters have a small push button located to the right of the Ethernet port. The push button is recessed behind a small hole. Use a 0.8mm paper clip or similar instrument to access the push button. This push button can be used to initiate join mode, leave mode, or factory reset the meter. The function depends on how long the push button is held down. The timing windows for each function are listed below.
Note that the status LED is used to indicate which function is currently selected; releasing the push button activates that function.
EG301x Push Button Timing
| Push Duration | Status LED | Description |
| 0.5 - 3 seconds | rapidly blinks blue/off | Join Mode: eGauge will attempt to pair with an existing HomePlug AV network |
| 13 - 16 seconds | rapidly blinks red/blue | Leave Mode: eGauge will randomize its HomePlug AV key, effectively unpairing the meter |
| 20 - 30 seconds | rapidly blinks red/green | Factory Reset: eGauge restores itself to factory settings |
Continuing to hold the push button for longer than 30 seconds will skip all functions without making any changes. Note that the timing window for these functions are very tight. It's crucial to release the push button as soon as the desired color code presents itself.
A factory reset will reset all settings on the meter and result in the loss of any recorded data.
LCD Method (EG41xx meters)
EG41xx meters feature an external LCD and multi-position switch. With this option, the eGauge and a HomePlug can be paired without network access to the meter. No special tools are required.
Physical access to the eGauge meter is required. Depending on the installation, there may be a risk of electric shock.
Using the multi-position switch, navigate to the HomePlug menu. Starting from the default "list of registers" view:
Toggle left or right until "Settings" is highlighted. Press the button in once.
Toggle left or right until "HomePlug" is highlighted. Press the button in once.
There are three options of interest under the "HomePlug" menu. Press the button in once to select the appropriate option.
EG41xx HomePlug Menu Options
| Option Name | Function |
| Join Others | Join Mode: eGauge will attempt to pair with an existing HomePlug AV network |
| Random PW | Leave Mode: eGauge will randomize its HomePlug AV key, effectively unpairing the meter |
| Default PW | Sets the HomePlug AV key back to the default: HomePlugAV |
The full manual on the EG4xxx LCD can be found here.
HomePlug Adapter Push Button Timing
Most HomePlug AV adapters will have a push button which can also be used to enter join mode or leave mode. Note that the timing windows vary across models and manufacturers. The timing windows below are for adapters commonly sold by eGauge Systems; it may be necessary to consult the manufacturer's documentation for other models.
TRENDNet TPL-406E HomePlug AV
| Push Duration | LEDs | Description |
| 3 seconds | DATA LED will go off, then turn back on |
Join Mode: adapter will attempt to pair with an existing HomePlug AV network |
| 10 seconds | All LEDs will turn off and turn back on |
Factory Reset: adapter restores itself to factory settings |
Actiontec PWR-500/PWR-200 HomePlug AV
| Push Duration | LEDs | Description |
| 0.5 - 3 seconds | All LEDs blink on and off |
Join Mode: adapter will attempt to pair with an existing HomePlug AV network |
| 5 - 10 seconds |
All LEDs turn off and on, LK LED should remain off |
Leave Mode: adapter will randomize its HomePlug AV key, effectively unpairing the adapter |
| 14 seconds | All LEDs turn off and on |
Factory Reset: adapter restores itself to factory settings |
TP-Link TL-PA2010 HomePlug AV
| Push Duration | LEDs | Description |
| 1 second | Power (top) LED blinks on and off |
Join Mode: adapter will attempt to pair with an existing HomePlug AV network |
| 10 - 11 seconds | All LEDs turn off and on, Link LED (middle) should remain off |
Leave Mode: adapter will randomize its HomePlug AV key, effectively unpairing the adapter |
Push Button Pairing Process
To pair an eGauge with an adapter, follow the steps below. Make sure to use the appropriate steps for your HomePlug model and eGauge model.
1. Verify the HomePlug AV adapter and eGauge meter are powered and within communication range (about 100' of wiring distance, not line of sight). The HomePlug AV adapter can be connected to the internet, but this is not required at this time.
2. Enter Leave Mode on the eGauge meter. Use the push button pairing instructions for EG301x meters and the LCD pairing instructions for EG41xx meters.
3. Enter Leave Mode on the HomePlug adapter. If using a supported HomePlug adapter, refer to the push button timing table above. If using an unsupported adapter, refer to the manual for that adapter.
4. Enter Join Mode on the eGauge meter. Use the push button pairing instructions for EG301x meters and the LCD pairing instructions for EG41xx meters.
5. Enter Join Mode on the HomePlug adapter. If using a supported HomePlug adapter, refer to the push button timing table above. If using an unsupported adapter, refer to the manual for that adapter.
The devices will now pair. The pairing process can take 5 - 120 seconds depending on signal strength. When the devices have paired, the LK or link light on the HomePlug adapter will light up. On the EG301x meters, the status LED will turn green (solid green if no internet connection is available, blinking green if an internet connection is available). On the EG41xx meters, a small house icon will appear in the upper left corner of the LCD screen.
Pairing through the eGauge user interface
If physical access to the eGauge meter is not available, it is also possible to pair the eGauge with a HomePlug through the eGauge user interface. Valid credentials are required for this process, and the eGauge must be within range of the HomePlug adapter (about 100' of wiring distance). This is the only pairing option for older eGauge2 meters.
If desired, it is possible to pair multiple eGauge meters with a single HomePlug adapter using this process.
If a mistake is made during this process, the eGauge may no longer be available online. At this point, the only way to restore connectivity would be to attempt to pair the eGauge and HomePlug using the push button pairing process. For eGauge2 meters, it will be necessary to follow the steps in the "recovering an orphaned device" section.
To pair devices through the eGauge UI, you will need the Device ID and MAC address for each device (eGauge meter or HomePlug adapter) you wish to pair. To locate the MAC address and Device ID for your eGauge, check the info label on the meter itself.
On the EG301x and eGauge2 meter lines the info label is located on the back of the unit (opposite the front label).
On the EG41xx meter line the info label is located on the side of the unit (opposite the CT ports).
The exact label for the HomePlug adapter will vary depending on the model and manufacturer. For most HomePlug adapters, the label is located on the back of the adapter (same side as the plug). Also note that various HomePlug manufacturers may call the Device ID by different names, including PWD and DEK.
Make a note of this information, then make sure that everything is reinstalled and connected properly.
When pairing through the UI, the HomePlug encryption key will be changed for the eGauge meter used to initiate the configuration process. Once the key is changed, these devices will only be able to communicate with one another.
UI Pairing Process
1. Connect to the eGauge meter.
3. A list of devices within range will appear. Find the MAC address which corresponds to the device you wish to pair, and enter the Device ID (or DEK, PWD, etc) for that device.
4. Repeat step 3 for any other devices you wish to pair. Note that the eGauge used for this process will not appear in this list, which is normal.
5. Choose a new password (encryption key) for the HomePlug network. Remember the default is HomePlugAV - if you use the default key, any HomePlug device will be able to connect to the network.
6. Click "Save" at the bottom of the page and enter your credentials. The pairing process may take up to 30 seconds. If the process was successful, a confirmation message will appear. If the process was unsuccessful, an error message will appear and no changes will be made.
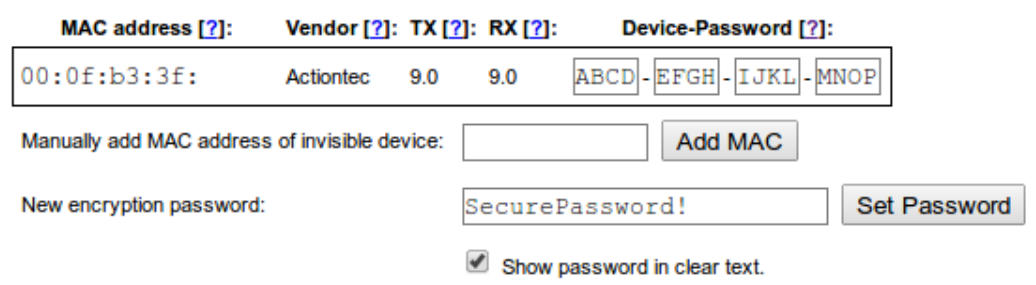
An eGauge paired with a single HomePlug adapter. Note the Encryption Key is not the factory default

An eGauge paired with a HomePlug and another eGauge meter. Again, note the non-default Encryption Key.
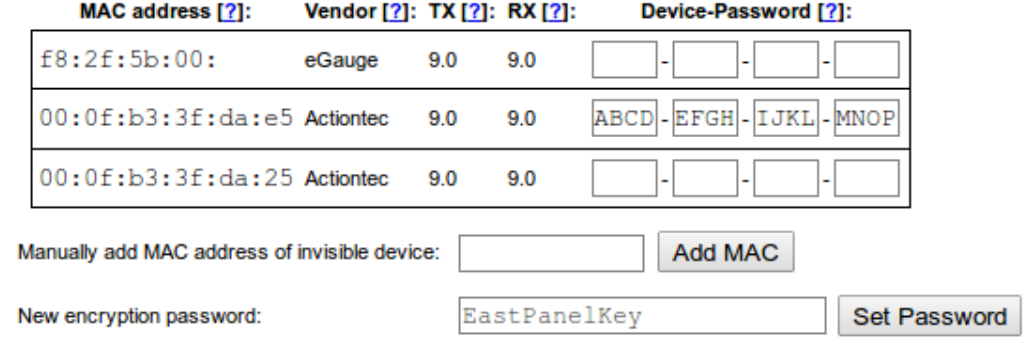
An eGauge paired with a HomePlug adapter at a location with two HomePlugs and two eGauges, preventing a HomePlug loop.
Recovering an Orphaned Device
It's possible that a device (EG301x or HomePlug adapter) may have an unknown HomePlug encryption key, and no method of reverting to the factory default key. These are referred to as "orphaned" devices, as they can no longer connect to any HomePlug network in their current state. There are two ways to recover orphaned adapters: via the eGauge UI, or via software utilities provided by the HomePlug manufacturer.
Via eGauge UI
It's possible to use the UI pairing process to set the device back to the factory standard HomePlug encryption key. Note that this process can be used for eGauge meters and HomePlug adapters.
This process is only necessary for orphaned EG301x or eGauge2 meters. For orphaned EG41xx meters, simply use the LCD interface to reset the HomePlug password, as outlined here.
To begin, make a note of the MAC address and Device ID (or DEK, PWD, etc) for the orphaned device. Make sure the orphaned device is reinstalled, powered on, and within range (about 100' of wiring distance).
1. Connect to the eGauge meter
3. A list of devices will appear. Ignore the list for now, and look for the "Manually enter MAC address of invisible device" field.
4. Enter the MAC address of the orphaned device. MAC addresses should be entered without colons (:).
5. Click "Add MAC". A new entry for the orphaned device will appear in the list of devices.
6. In the list of devices, locate the manually-added device (the Vendor column will list it as <manual>). Enter the Device ID (or DEK, PWD, etc) for that device.
7. Choose a new password (encryption key) for the HomePlug network. Remember the default is HomePlugAV - if you use the default key, any HomePlug device will be able to connect to the network. This is probably desired when rescuing an orphaned device.
8. Click "Save" at the bottom of the page and enter your credentials. The pairing process may take up to 30 seconds. If the process was successful, a confirmation message will appear. If the process was unsuccessful, an error message will appear and no changes will be made.
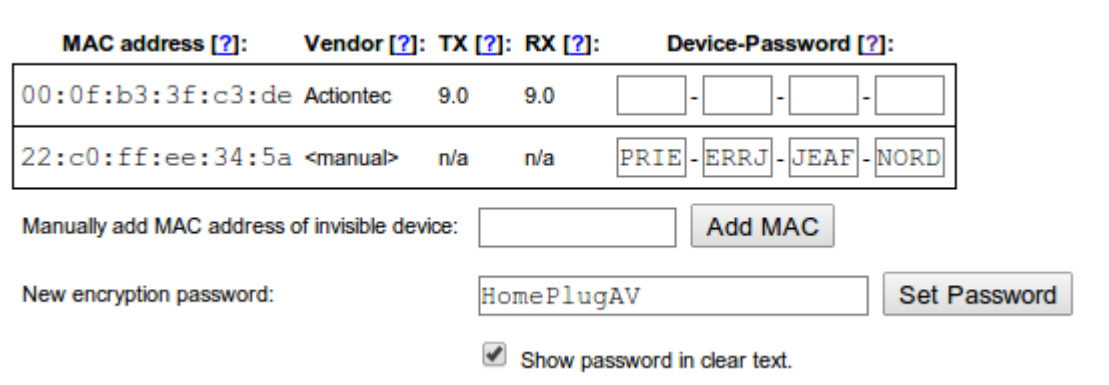
Example of an orphaned device recovery in process. Note the Encryption Password is set to the default value.
Via Vendor Software
The software below is not written or maintained by eGauge Systems. No guarantee is made regarding functionality. When using a third party adapter, it may be necessary to obtain the correct software from that adapter's manufacturer.
For HomePlug AV adapters from TP-Link, the software located at the following link may be used. For issues with the software, contact TP-Link directly.
https://www.tp-link.com/us/support/download/tl-pa2010/#Utility