Custom HTTPS certificates (EG4xxx only)
Starting in firmware v4.2 a custom HTTPS certificate may be uploaded to the meter and used for local HTTPS webserver access. This does not affect the proxy-server access (e.g., https://eGauge9999.d.egauge.net , https://eGauge9999.egaug.es or https://egauge9999.egauge.io).
eGauge Systems cannot provide certificate files or assist with certificate generation.
Only EG4xxx model meters may be used with custom HTTP certificates.
The certificate must be a single file containing the private key and full chain and certificate in PEM format. See below for an example of how this file should look.
Installing the Certificate
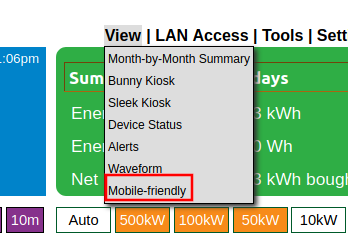
From the main eGauge interface, navigate to View -> Mobile Friendly:
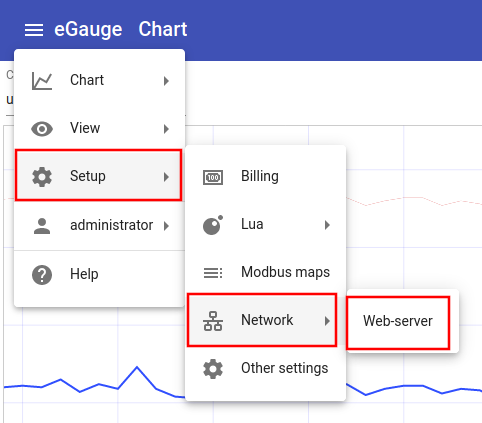
Click the hamburger menu in the upper left-hand corner and navigate to Setup -> Network -> Web-server:
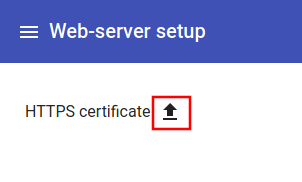
Click the "Upload" button:
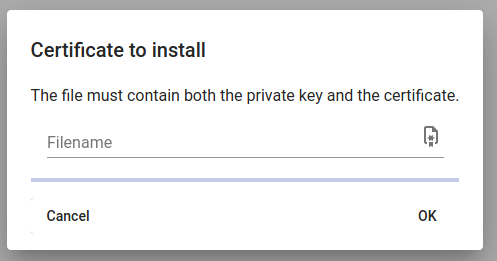
Click where it says "Filename" and choose the certificate file to upload. This must contain the private key and full chain in the same .pem file.
If successful, you will be redirected back to the main page and see a confirmation at the bottom of the page the certificate was updated:
If there is a problem with the certificate file uploaded, you will receive an error message at the bottom of the screen:
If there is a failure, check the certificate file format is correct and not corrupt.
Certificate file format
The certificate file must be in .pem format and contain the private key and full chain. It should have a single BEGIN PRIVATE KEY stanza, and one or more BEGIN CERTIFICATE stanzas. For example, a certificate may look similar to this (note: this example uses random data; it will not function as a certificate).
-----BEGIN PRIVATE KEY-----
UQgbR5+plL42go05/VKtq3F24IdC5XPVJ2/X3L5cn7cvyZFCiQ58tk
4YYLwmm4b035/rg65e6YuyEDo+zxCOikMPaSeIuBWtLBKQUZw3bTyc
GtQ4FipRXBcFySDdEFuM1YuS7e8M9/h3mt5dIrJnrRA/Pa9x6gzkWz
4Ow9xbm0JgPGkfaJVX5vbauIr0UAc72MNg+lO8uuA2jH+f1fdpe4Rg
YhWKwuum4ZOjh+t5b4PgPmkSGJDR0W7w1Y55TXlxXEm=
-----END PRIVATE KEY-----
-----BEGIN CERTIFICATE-----
0QUubtUgnDnougS2OqNgoeNkeE2fGEJInSTA4hfk6AyqSWU5qS7qgF
yVcC/ixal1yjtrXoASENP5r3tQALpiFr/+PFnHS/+g2Ja7DQqYRByO
M1Za4oiLqpphyEMAB7CdXK4Etla8JbWj60XX2DLxwys9TxZR6UrsKl
ghZORWId89MaKlz5Xy1ymPy2Iz7GUASdchtWZyeOz+w+5dZvGUQ/O6
MGsIAqXO/t6UUsxfSLzyCwUlahL7FQ3Pa3XPcwPEaoaBt/II4CEzCw
DqZki2STUjCVHO/RR3vuswEClHXsyR+Pq8xnuzdnD2vSEumL7QQwf1
DnsW7IKMGkMMfDm2
-----END CERTIFICATE-----
-----BEGIN CERTIFICATE-----
UfWOH8729kTbI5GRr5N13R0Coqys4lXtboiI5o97XYLt/S5I/r49WY
3dnlKlaILurkzptNuY2PywlClib9Zkvu3ZukFusvMV2cick7NLTmim
rBOYeFGL/j7lO+jpLVLySLL9ER2tlUS+EJpI+P5qhJkudQrMDTniQm
FWcAtaD7vQ2LTYlWoJj/p5Xgfb/t7SwwGF7TS4Mq+2zRzVwcx9wm7N
ddp7zK9hWm/uw+hMG8moVAk6k+g5/LN8HmoDQDWR09WB4PPcJcLbmn
4Hy2Q8vJYRS3wBjUdy1CXZcmMS2RJLwAo6V8r4eEn5Krudbqm/hsUr
QHBRbftX/rvUGRhl
-----END CERTIFICATE-----
Creating certificate file example
Most certificate services provide separate certificate and key files and the private key needs to be concatenated with the certificate. For example, Lets Encrypt as of this writing provides several files: cert.pem, chain.pem, fullchain.pem, privkey.pem, and README. The example below show obtaining a Lets Encrypt certificate and creating the pem file to upload to eGauge. The file egauge-cert.pem will contain the contents of privkey.pem followed by fullchain.pem and can be uploaded to the eGauge meter.
root@localhost:~# certbot certonly -q \
                  --dns-cloudflare \
                  --dns-cloudflare-credentials ~/.secrets/cloudflare.ini \
                  -d meter-name.example.com

root@localhost:~# cd /etc/letsencrypt/live/meter-name.example.com

root@localhost:/etc/letsencrypt/live/meter-name.example.com# ls
cert.pem  chain.pem  fullchain.pem  privkey.pem  README

root@localhost:/etc/letsencrypt/live/meter-name.example.com# cat privkey.pem fullchain.pem > egauge-cert.pem


