
eGauge Display Caster Manual
This manual is for the most current display caster software. Older version display casters may have alternative keystrokes to access the main menu or factory reset.
The possible keystrokes for a factory reset are ctrl+shift+j, shift+escape, f, r, tab, or ctrl+shift+f
(current version).
The possible keystrokes for accessing the main menu are shift+escape, m or ctrl+shift+m (current version).
Introduction
The eGauge Display Caster (EDC) is designed to be an easy to use, low-maintenance method of displaying an eGauge interface on a kiosk or lobby display.
Changing configuration or opening custom kiosks requires the EDC administrative password. By default, this
password is set to ctzTm2kc. For security, the admin password must be changed after installation. A factory
reset will restore the password to ctzTm2kc.
The EDC connects to the TV or monitor using HDMI, and is powered by USB. It is preferable to supply the EDC with the included 5V 2.1A power brick for stable power, but it may be connected to a USB port such as on the back of a television.
The EDC is designed to be secure, but it is best to keep the physical hardware and input ports out of publicly accessible locations, such as where a malicious user may connect a keyboard and mouse.
When powering the EDC, it is important to ensure HDMI is connected before power. The EDC auto-detects the resolution of the display, but it will not auto-detect if HDMI is not connected prior to powering on.
During normal operation, the only inputs connected should be USB for power and HDMI for display. Remove any other connected inputs such as mouse and keyboard.
Quick Setup Requirements
The requirements for the EDC to work as intended is:
- Configure network settings
- Configure date and time-zone
- Configure default kiosk
Notes on operating behavior and kiosk load failure
When the EDC powers up, the main "Kiosk Menu" will be displayed. If a default URL or Kiosk has been saved, a message and countdown timer will appear indicating it will be displaying the default kiosk in 10 seconds. This allows you to cancel the countdown and re-configure the EDC if required.
If a URL/kiosk is attempted to be loaded but cannot be displayed, a warning screen will appear and re-direct back to the main "Kiosk Menu". If a default kiosk/URL is configured, but the eGauge cannot load it, this can lead to "bouncing" back and forth between the main "Kiosk Menu" and a warning message.
This is beneficial in the fact if an eGauge is unavailable and displays a 404, the EDC will continuously try to re-load the page rather than permanently display a 404 not-found page and require a manual power cycle.
If necessary to remove power to the EDC, it is best to perform a graceful shutdown from "Advanced / Status". This is the case with any computer-like device; removing power without warning can lead to corruption. The EDC hardware is designed to cope with unexpected power loss, but it's best to shut down before removing power.
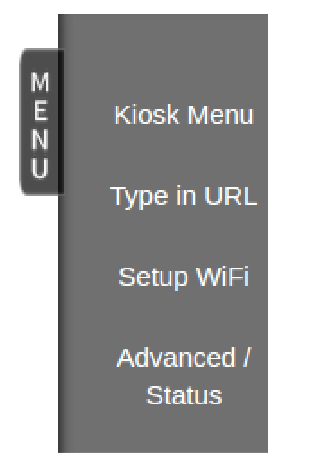
Main menu
To access the main menu while an eGauge meter interface is displayed, you may press CTRL+SHIFT+M at the same time. From the main menu, you may click the "MENU" button in the upper right-hand corner to bring up the full menu:
Initial Setup
When first powering up the EDC, connect the HDMI, then USB power, and keyboard and mouse. The first screen displayed will be the Kiosk input screen. The display caster will remain on this screen until configured appropriately.
You may want to change the default password to something more preferable to complete the setup with. This can be performed in the "Advanced / Status" tab from the Main Menu.
Network configuration
The first step is to configure the network interface, otherwise the EDC will not be able to display the eGauge interface.
Using WiFi
By default, the EDC is configured to use WiFi. If using WiFi, open the Main Menu and choose "Setup WiFi". You will be presented with the following screen:
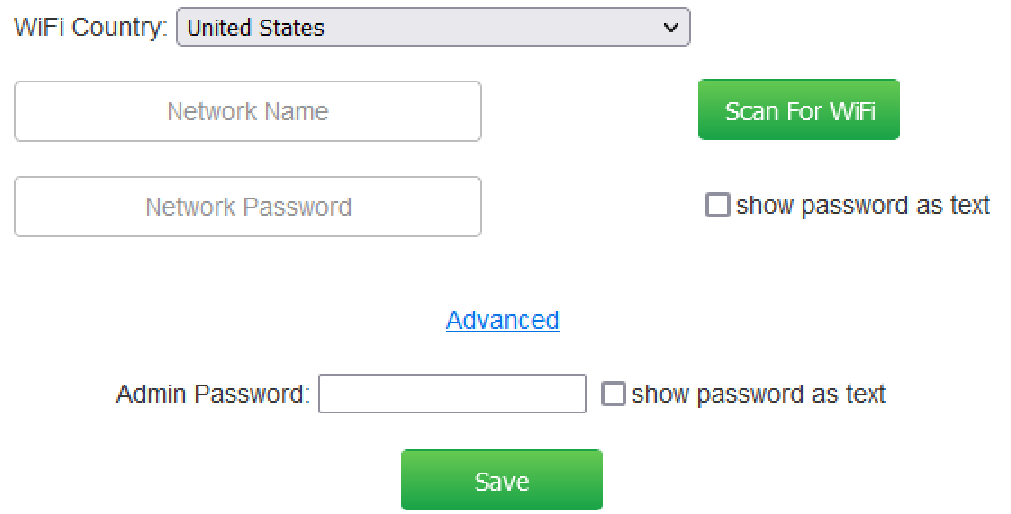
Enter the EDC admin password and choose "Scan For WiFi". Choose your WiFi network from the drop-down menu. Alternatively, if the network is not broadcasting the SSID, enter it in the "Network Name" text input. Note the SSID is case-sensitive.
Enter the WiFi network password in the "Network Password" box. Note the password is case-sensitive. Press "Save" when complete. The EDC will reboot.
A static IP address may be configured in the "Advanced / Status" tab of the Main Menu.
Using Ethernet
If using Ethernet-direct for the EDC communication, use the Main Menu to open the Advanced/Status page.
Enter your EDC admin password at the top of the page. Scroll down to "Interface" under the "Advanced settings" and change from "wlan0" to "eth0". Click "Update default interface". The EDC will reboot and you will be brought back to the main screen.
A static IP address may be configured in the "Advanced / Status" tab of the Main Menu.
Configure the Time and Timezone
The EDC will attempt to synchronize time using NTP. If unavailable, the time must manually be configured. Regardless, the time-zone will need to be set correctly to display the eGauge kiosk in local time.
Ensure "Current date and time (24H format)" is showing the correct current time. If not, click "Edit time". The time will freeze and you may enter the new date and time in 24-hour format. Click "Save new time".
Configure eGauge Kiosk to display
Finally, the last required step is to choose the eGauge Kiosk to display when the EDC is in normal operation. If viewing a device local on the same network to the display caster, you may navigate to "Kiosk Menu" from the Main Menu, which is the same page that shows when the EDC is powered up.
IMPORTANT: Check "Use as default device and kiosk", and enter the EDC admin password before choosing to load the Kiosk. This will ensure if the EDC loses power and is restored, that it will automatically load the eGauge Kiosk.
If no default kiosk is set, the EDC will only display this page in the event of a power cycle. Choose either the "Sleek Kiosk" or "Normal Kiosk" (main default graph), and the EDC will attempt to load your eGauge interface. eGauge recommends the Normal Kiosk view.
If your kiosk fails to load, verify the device name is correct and the device is accessible on your LAN via host-name.
If the meter is not on the same LAN as the EDC, or needs to be accessed at a different address, configure the full URL in the "Custom URL" section. This may be used to access a meter over the proxy server, for example https://eGaugeHQ.d.egauge.net.
Custom URL
If the EDC is unable to reach your eGauge locally, a full URL may be entered in "Type in URL" from the Main Menu, such as http://eGaugeHQ.d.egauge.net. Other custom URLs may be entered, but functionality is not guaranteed if the URL is not from an official eGauge device.
Remember to check "Use as default device and kiosk" or the EDC will not automatically load this after a power loss and restore!
For security reasons, loading any custom URL requires the EDC administrative password.
Advanced settings and status
There are several other options available in "Advanced / Status" from the Main Menu. Taking any action on this page requires the EDC admin password.
Advanced settings
-
Current date and time (24H format): Displays or sets the current date and time on-board the EDC.
-
Time-zone: Displays or sets the currently configured time-zone on the EDC.
-
Language: Displays or sets the currently configured language on the EDC. Not all languages are supported on the EDC and meter interfaces.
-
Force update default URL: This bypasses schema checking for custom URL. There is little to no reason for this to be used.
-
Keyboard: Displays or sets the currently configured keyboard layout.
-
Update password: You may change the EDC admin password using this option. Enter a new password, press "Update Password", and confirm the new password. A minimum password strength must be established.
-
Screen orientation: You may choose to rotate the HDMI output of the eGauge Normal, Right, Left, or Inverted (0, 90, 270, 180 degrees, respectively).
-
Interface: The network interface the EDC will use for communication. Only one may be used at a time. Choosing an active interface will disable any others.
-
Static IP configuration: A static IP address may be configured for the active interface. It may also be reset to DHCP.
Tools
-
Shut down system: This will power off the EDC. The EDC will not turn on without power being removed and re-connected, such as removing and reconnecting the USB power wire, or power loss and restore.
-
Reboot system: This will reboot the EDC.
-
Update system: This will attempt to update the firmware on the display caster, if a new version is available.
Status
Miscellaneous network information will be displayed here including:
-
Active interface: The interface in use. WiFi functionality will be unavailable if eth0 is used.
-
MAC address: The MAC Address of the active interface.
-
IPv4 address: The IPv4 address of the EDC. If blank, the EDC cannot obtain an IP address from the network.
-
IPv4 broadcast address: The IPv4 network broadcast address.
-
IPv4 gateway: IPv4 gateway of the network.
-
SSID: If WiFi is used, this is the network it is configured to connect to. If "undefined" and the default interface is wlan0, the EDC could not find or authenticate with the configured network.
-
WiFi Quality: This shows the signal (dBm level) and "quality" of the WiFi signal. If "undefined" and the default interface is wlan0, the EDC could not find or authenticate with the configured network.
Factory reset
A factory reset may be performed with a keyboard on the EDC. A factory reset will restore EDC administrative password, reset network interface configuration, and reset the default URL/kiosk. To perform a factory reset, press:
CTRL+SHIFT+F
The display will turn off momentarily and the display caster will restart with factory default settings.