Alerts and Email Gateway with SendGrid
Introduction
If delivering email to only one recipient, consider using the eGuard Alert Service to send device alerts as it is the easiest method for delivering email alerts.
You will need your own website's email address to send email from; Gmail, Yahoo, AOL and other public email services may not work with this method.
Compatibility Notice: Beginning in June 2023, only EG4xxx will be compatible with the SendGrid SMTP gateway. Legacy meters such as EG30xx and eGauge2 will fail to send alerts via the SendGrid SMTP gateway.
SendGrid is a free third party service unaffiliated with eGauge which provides a consistent outbound email delivery service. It can be used for eGauge alert delivery, and is more reliable than not specifying an "Email Gateway". Without an "Email Gateway" configured, alert emails may be rejected, dropped, or fail inconsistently.
It is intended as a commercial service for businesses rather than individual end users.
SendGrid allows up to 100 emails daily with the free plan.
SendGrid provides delivery information and monitoring such as email delivery failures, number of emails sent and other features.
Disclaimer
SendGrid is a third party email delivery service with no affiliation with eGauge Systems. eGauge Systems cannot guarantee email delivery, uptime, or security of using SendGrid.
Information on this page will be updated on best effort level. Information including pricing, set up instructions, screenshots, and locations of items are not guaranteed to be up to date or consistent.
eGauge Systems does not provide any support for SendGrid's services, and cannot assist with account creation, password recovery, or similar issues.
Pre-setup notes
Email can be delivered from the eGauge meter using SMTP server smtp.sendgrid.com and a sendgrid API key.
If using alerts on multiple devices, it is advised to set up a unique API key for each one, so that if the key becomes compromised or the meter becomes inaccessible and alerts cannot be disabled, the API key can be revoked for only that meter.
API keys are passwords and are displayed only once after creation.
Setup
- Set up API keys:
Initial account creation and setup wizard for first email
or
Adding a second API key, or adding without the wizard from the main dashboard - Verify a sender identity
- Configure the eGauge meter
Initial account creation and setup wizard for first email
- Create an account at https://sendgrid.com/
- Click "Start" to the right of "Integrate using our Web API or SMTP relay"

- In "Choose a setup method", choose "SMTP relay"

- Give the API key a name, like "eGauge Alerts Emails" and press "Create Key"

- You will now be given the SMTP server (smtp.sendgrid.net), the username (apikey), and password (hidden). This is the only time the password will be displayed, it should be saved somewhere securely like an encrypted keychain if it will be used more than once. Keep this page open or copy the password as it will be used in a later step.

Adding a second API key, or adding without the wizard from the main dashboard
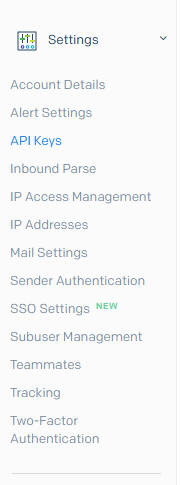
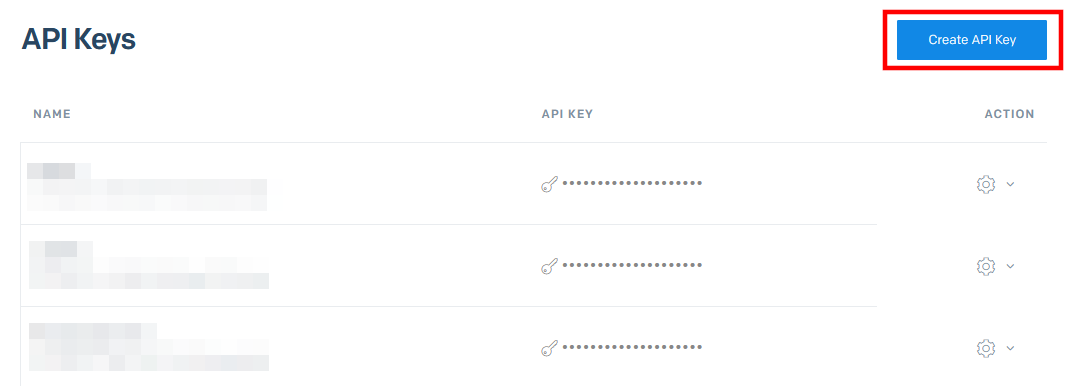
- In the main dashboard on the left-side menubar, expand Settings and click API keys.
- Click "Create API Key" in the upper right-hand corner:

- Choose "Restricted Access" as the API key permissions, expand the "Mail Send" section, and click the dot on the right side of the bar next to "Mail Send" to grant that permission

- Click "Create and View", and copy the API key displayed on the next screen. This will be used to configure the eGauge meter in a later step.


Verify Sender Identity
You will need to set up Sender Authentication so the receiving email server trusts and accepts the email the eGauge meter delivers. Follow the instructions for Single Sender Authentication (simple: sends an email link to verify email address) or Domain Authentication (advanced: requires modifying DNS entries on your website).
Without sender authentication, you will see an error such as The from address does not match a verified Sender Identity when sending a test email without verification completed. It will contain a link with information to set up sender authentication.
The email address you verify will be used in the Custom "From" address setting in the eGauge meter alert settings.
Configure the eGauge Meter
- Navigate to Settings -> Alerts, ensure "Alert Provider" is set to "SMTP Gateway" and click on "View/Edit Gateway & Alert Destinations". Enter the mail server hostname (
smtp.sendgrid.com), username (apikey), and the API key / password that was created previously. For the Custom "From" Address, enter an email identity verified in the previous step.
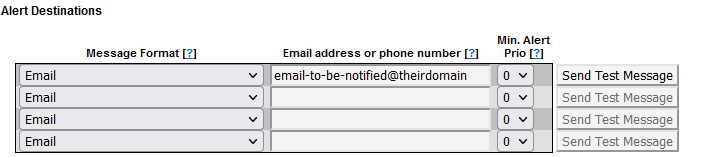
- Enter the email address(es) that should receive alerts from the meter under Alert Destinations.

- Press "Save" at the bottom of the page, and then "Send Test Message" to the right of each Alert Destination to ensure the delivery works.