
eGuard Overview
There's a lot in eGuard! Additional documentation can be found in the eGuard Fundamentals chapter.
eGuard Overview
eGuard is an administrative management system for eGauge devices that allows an individual to monitor and manage multiple eGauge meters from a single web interface.
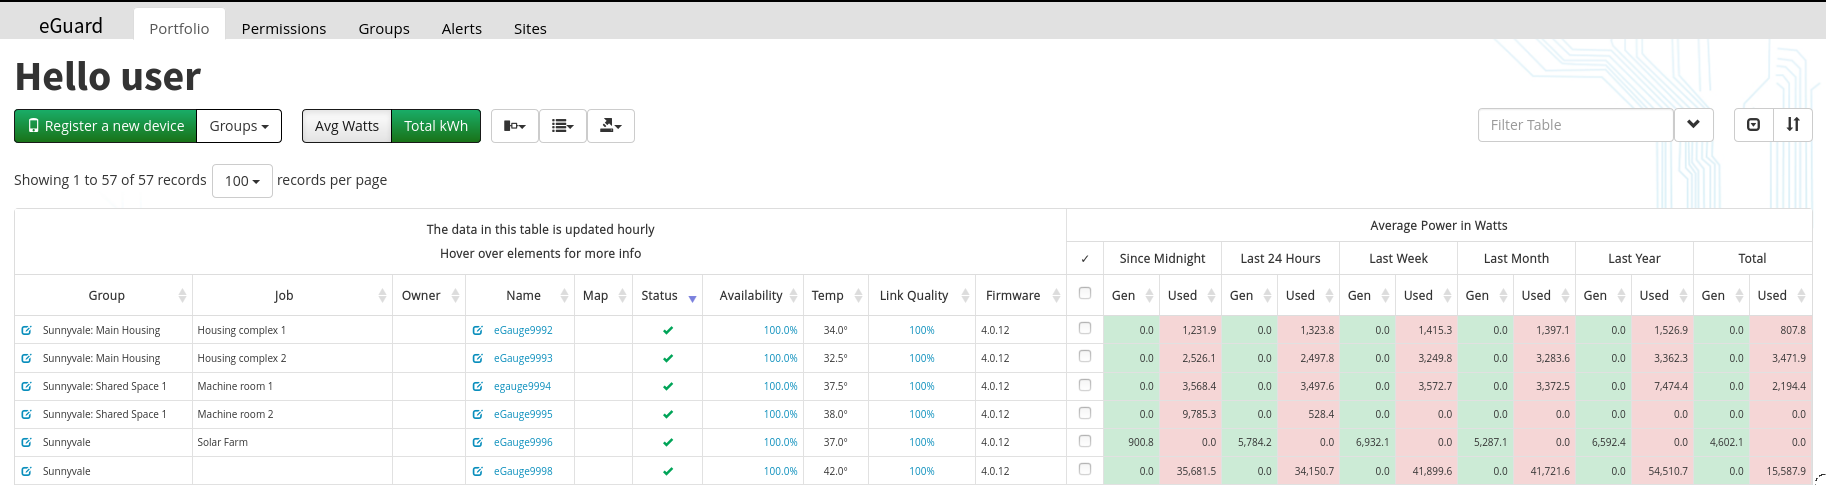 |
| eGuard Portfolio for group "Sunnyvale" |
The eGuard interface allows you to view the current status and statistics for all devices you have rights to. With proper authorization, you can also use eGuard to enable remote administration, create device notes, assign and manage groups, monitor device uptime, and check production and/or usage statistics.
eGuard can also generate alerts to inform users of device connectivity issues, low production, high usage, and incorrect time settings.
Devices can be added to groups or sites. Groups can be used to allow other eGuard users to monitor and administer specific devices, while sites allow devices to be organized based on installation location.
To access eGuard, you will need to create an account at eGauge.net. Log in using the green login button at the top of the page. After logging in, the login button will change to a drop down menu. All eGuard functions (as well as other functions outside of the scope of this document) can be found here.
Who is eGuard For?
eGuard is a complementary tool for those who need to manage five or more eGauge devices. eGuard provides quick and direct access to device status information. eGauge highly recommends that any new customer ordering more than five eGauges contact the eGauge support department at support@egauge.net to set up an eGuard account. Newly purchased devices are added to eGuard automatically, before they are shipped.
Use eGuard as a Customer Relationship Management (CRM) tool or in conjunction with other CRM software to identify and address issues quickly and efficiently. Note that eGuard is a tool intended for installers and site administrators and is not intended for use by the average end user. No additional information is provided through eGuard that cannot also be obtained through the eGauge interface directly.
Signing up for eGuard
Please see this article for information on signing up for eGuard and obtaining access to a group of devices.
eGuard Functionality
Portfolio (main view)
The eGuard Table page is the main summary area for eGuard. This page presents a table of devices associated with your username. The data on the page is updated hourly.
Top Menu Bar
|
|
Register a new eGauge meter and bring into account. |
|
|
Choose to display only one of your owned groups, or sub-groups. |
|
|
Display average wattage in the summary table. |
|
|
Display total kWh values in the summary table. |
|
|
Hide or show columns/fields. |
|
|
Enable group-by device view which shows group separator row and groups by Group/Subgroup, Job name, or Owner (registrant). |
|
|
Perform a mass CSV export of devices in portfolio. |


Device filter (search)
On the right-hand side of the page there is a device filter (search) function. Any devices listed in the table can be filtered for text found in the name, job, and other fields.
|
|
Enter your search text here. |
|
|
Advanced search: also enter specific Group, Job, Owner and other field filters. |
|
|
Hide/show the "Showing N to X of Y records" and "N records per page" option. |
|
|
Multi-level sorting function. |


Main Table Data
|
| eGuard Portfolio for group "Sunnyvale" |
The following columns are available to display data for the devices.
| Group |
Each device belongs to a group. A single user can administer multiple groups, and each group can contain multiple subgroups (which can then be shared with other users). Permission required: Administrator or Manager.
To the left of the group name is a Group Editor button. Clicking this button will allow the user to make or change group assignment if they have appropriate permissions (Administrator or Manager). |
| Job | This value is set on the Device Details Page and allows the user to identify the specific job of an meter, if desired. This value does not need to be unique for each eGauge. |
| Owner | User who registered this device. This may or may not be the same as the eGuard administrator. For example, a device might be administered by “Installer” but owned by “Homeowner”. This value will be blank if the device is not registered |
| Name |
The name of the eGauge meter. This can only be changed by contacting eGauge directly, and is guaranteed to be unique. The name itself is also a link to that eGauges user interface (provided the device is online).
A notepad icon appears to the left of the Name. When clicked, it will open the Device Details Page for the eGauge adjacent to the button. Job name and notes can be edited here, as well as certain actions like password resets. |
| Map | If a meter has latitude and longitude set in Settings -> General Settings, this column will display a globe icon. When clicked, a map centered on the location of the device will load in a new window. |
| Status |
Shows whether the eGauge was on the proxy during the most recent check by eGuard.
This value updates once an hour, so it is not guaranteed to show if a meter is currently available or not. |
| Availability | Describes the device uptime over the past five days as a percentage. Hovering the mouse cursor over the percentage will cause a popup to display with an hourly uptime chart, as well as the last seen date and time. |
| Temp | Device internal operating temperature. This should not be confused with ambient temp, and will almost always be warmer. |
| Link Quality | Connection quality reported by eGauge. Will show 100% for Ethernet. HomePlug and WiFi/cell may show various values. |
| Firmware | Shows current firmware version for a given device. Versions listed in red should be up-graded as major bug fixes and patches have been implemented in newer firmware, please update firmware in this case. |
| Model | The model of the eGauge unit. May be blank on older model eGauge2 units. |
| Power/Energy Values | The right-hand side of the table displays either average wattage (kW) or total energy (kWh) depending on what is selected in the top menu bar. These values reflect the Usage and Generation virtual registers configured on the meter. |
Device Details Page
The Device Details Page is a summary and control area for a specific eGauge meter. Each meter will have its own device page, regardless of whether it is in a group or site with other meters. Use caution when changing settings on the device page, as it is possible to overwrite settings and user credentials.
The device details page can be accessed by clicking the notepad icon to the left of the device name in the eGuard Portfolio table, shown in the red circle:

|
|
| Device Details Page for eGauge9995 |

The following information and functions are available on the Device Details page (some information may not be available on lower privileges than admin)
| "You are an admin for this device" |
Shows your user level for the device, and some additional information about it. Data For Device: Opens eGuard portfolio view with only that device. Reset Password: A random password can be generated for the selected user account. |
| Privileged Device Info | Shows privileged device information such as MAC(s) and serial numbers for device. |
| Remote Administration Control | Enables or Disables remote administration for the first user configured on the eGauge. |
| Firmware | Download firmware files for EG3xxx and EG4xxx for manual upgrades via interface or USB. |
| Remote Configuration Control | Allows a different device's configuration to be copied to this device, assuming the other device is in the user's group and both are online, same model and sufficient registers. |
| Job Name | This is the Job name that shows up in the eGuard portfolio view. |
| Installer Notes | Custom notes may be added and associated with the device. |
| Create Site Info | Create a new site and link device to it. |
| Link eGauge9995 to an Existing Site | If a site already exists, link device to it. |
Groups
See the eGuard Groups article.
Permissions
See the eGuard Permissions article.
Alerts
See the eGuard Alerts article.
Sites
See the eGuard Sites article.