
Overview
Follow the steps in this guide to register an eGauge meter to your eGauge.net portfolio.
Prerequisites
In order to register an eGauge meter, you must have a valid eGauge.net account. If you have not yet registered, please create a new account here.
This information needed for registration is found on the label affixed to the side of your eGauge meter:

- If a meter has been previously registered by another user, please contact eGauge support for assistance.
Instructions
Step 1: Log into eGauge.net with the user account you want to register the meter under. If you're already logged into the website your username will appear in the upper right hand corner of eGauge.net. Otherwise, click ‘eGuard login’ and continue by entering your login credentials.

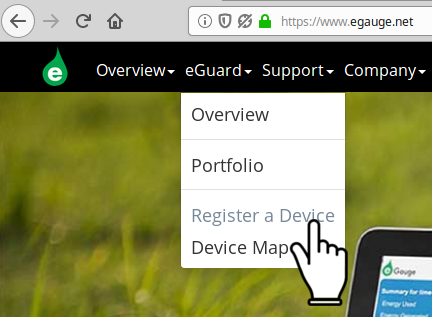
Step 2: After logging in, choose eGuard → Register a Device from the top of the webpage.
Step 3: Enter the registration date, device name, and MAC address. The MAC address should start with F8-2F-5B. Enter the MAC without colons, dashes or spaces.
If you have access to any existing eGuard groups, you can assign the meter to a group.

Step 4: Click the ‘Register Device’ button. You should now be able to locate the newly registered meter in your portfolio by navigating to eGuard → Portfolio from the main page.