Overview
There are two primary methods for accessing your eGauge meter interface. In each case, the interface is accessed using a web browser. No additional software is needed.
Prerequisites
Both of the methods covered in this article assume the eGauge is connected to the local network at the installation site. For information regarding accessing the eGauge interface without a network please see: Direct Connect Guide
Instructions
Method 1: Remote access via the eGauge proxy service:
Step 1: The meter must have Internet access and be able to connect to the eGauge proxy service. For details on the network connections used by eGauge, please refer to: Network Connections.
Step 2: From a computer with an Internet connection, launch your preferred web browser and type the eGauge meter URL in the address bar. The URL is based on the eGauge meter name and is usually in the form of: https://DEVNAME.egauge.io
eGauge 2, EG3xxx as well as EG4xxx model meters sold prior to January 1, 2024 may be found at: https://DEVNAME.egaug.es
Step 3: You can add your eGauge URL to your browser bookmarks for later reference, if desired.
- Meters that have been connected to the Internet for at least an hour can also be found online by entering the device name in the ‘Find my device’ tool linked here.
Method 2: Local access via host name or IP
If the eGauge does not have internet access, or is not allowed to access the proxy server, it can be accessed from the local IP address or device name.
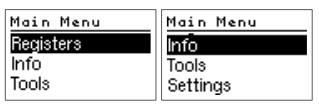
Step 1: Locate the device name and IP address on the EG4xxx LCD screen by depressing the toggle switch to get to the main menu, toggle to "Info" and depress the switch, and toggle left or right to see "Name" and "IP address":


Step 2: From a computer connected to the same LAN, launch your preferred web browser and type the eGauge meter IP address or host name in the address bar.
Troubleshooting and Tips
A "Not Found" response means the eGauge is not connected to the proxy server. The eGauge requires outbound connections to port TCP 8082 and 8084 of d.egauge.net or egauge.io for the remote connections to work. See this article for more information about network connections.
Configuration Notes for older meters:
If you are on the same local network where the eGauge is installed and are configuring for the first time, you may need to click "LAN Access" in the top right of the page to redirect to the local IP address of the eGauge. This is required on meters shipped before January 2021.

For meters purchased on or after Jan 2021, the factory credentials are printed on the side of the meter.
For meters purchased prior to Jan 2021, the factory credentials are user: owner pass: default
Note that these credentials may have been changed.
eGauge support cannot provide the password currently set on a meter or the default password on meters shipped on or after Jan 2021.
Additional Resources