EG4xxx meters (Core and Pro) documentation
- Meter Comparison Chart (difference between Core and Pro meters)
- EG4xxx owner's manual
- EG4xxx Certification Documents and Declarations
- Quick Start Guide
- EG4xxx LCD Manual
Meter Comparison Chart (difference between Core and Pro meters)
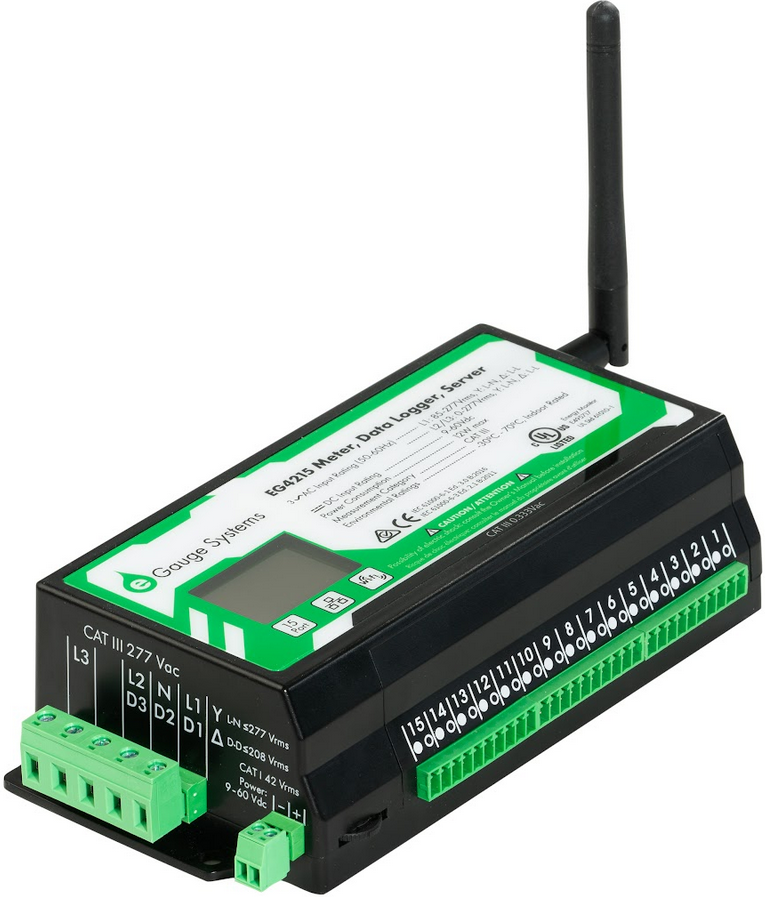
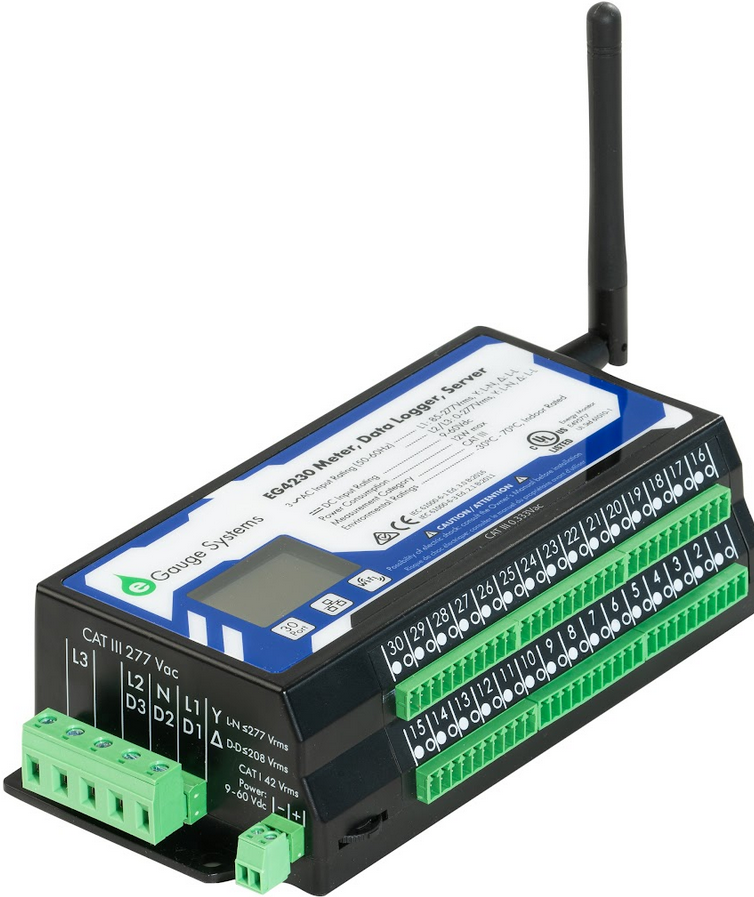
eGauge has 4 current models of meters: Core (EG4015), Core WiFi (EG4215), Pro (EG4030) and Pro WiFi (EG4230).
All EG4xxx models have the same integral features. They only differ by the number of CT inputs and communication methods.
Comparison Chart
 |
 |
|
|
|
| Name | eGauge Core | eGauge Pro | eGauge Core WiFi |
eGauge Pro WiFi |
| Model | EG4015 | EG4030 | EG4215 |
EG4230 |
| Sensor Inputs | 15 | 30 | 15 |
30 |
| Full Spec Sheet | Download | Download | Download | Download |
| Online Store Link | Store Link | Store Link | Store Link | Store Link |
| AC voltages |
(0 to 277) Vac Phase-Neutral, (0 to 480) Vac Phase-Phase, 50/60Hz
|
|||
| DC voltage range | ± 60 Vdc |
|||
| Current measurements | 6900 A Max |
|||
| Logging capabilities | V, A, W, Wh, Hz, VA, VAr, THD, deg, and more |
|||
| Onboard logging capacity | Last hour: 1 second granular Last year: 1 minute granular Last 10 years: 15-minute granular Meter Lifetime: 1-day granular |
|||
| Ethernet | Yes |
|||
| USB | 2x USB 2.0 ports for power or supported communication options |
|||
| LCD Screen | Display kW, kWh and other information, limited configuration and tools |
|||
| Modbus | Modbus TCP, Modbus RTU (with USB485 serial converter), input and export | |||
| BACnet | BACnet IP and MS/TP, export (with USB485 serial converter) |
|||
| API access |
XML API, JSON API automatic data push or poll. JSON API has configuration support and many more features than the XML API. |
|||
| Accuracy | ANSI C12.20 0.5% Accuracy Compliance |
|||
| Certifications | UL, FCC, CE |
|||
Understanding Model Naming Convention

EG4xxx owner's manual
The owner's manual for the EG4xxx line of hardware. To download, click the link or icon below.
|
|

EG4xxx Certification Documents and Declarations
The EG4xxx Certification and declaration documents details may be viewed and downloaded below. Some documents contained privileged and sensitive information and have been truncated.
- Made In America Compliance Statement
- FCC
- ANSI C12.20 (AccuCT CTs)
- ANSI C12.20 (ECS CTs)
- CE Declaration of Conformity
UL certification may be found in the UL Product iQ service by creating a free account and searching for "eGauge". PDF copies of the page are provided below. Please use the UL Product iQ service for the latest certification statement.
- UL: United States
Reprinted from the Online Certifications Directory with permission from UL (© 2024 UL LLC) - UL: Canada
Reprinted from the Online Certifications Directory with permission from UL (© 2024 UL LLC)
Quick Start Guide
An EG4xxx Quick Start guide is included with each meter. A copy may be downloaded here.
EG4xxx LCD Manual
eGauge meters in the EG4xxx line feature an integrated LCD display which can be used to view data and make
changes to the device configuration. Navigation is handled through the small control toggle located to the left
of the CT ports. The control toggle has three potentials - left, right and pressed in. By default, the LCD scrolls
through a list of registers (the contents of this list are customizable) and also displays the device hostname
and current IP address.
To access the main menu, press in the control toggle. The following screen will appear:
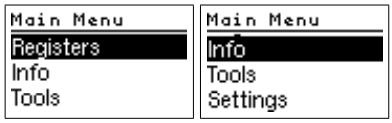
Figure 1: All items in Main Menu view
Status Bar
The status bar appears at the top of the LCD (main and sub-menus do not show the status bar). There are four
primary pieces of information displayed in the status bar, as shown below:
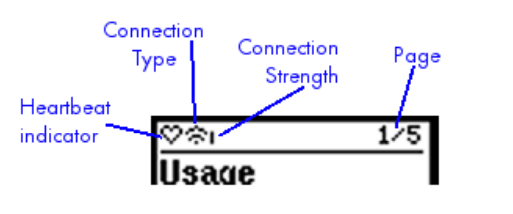
Figure 2: The status bar icons
Heartbeat indicator – alternates between full and empty indicating that the eGauge is running and the
display is active.
• Connection type – shows the communication technology in use. There are four possible connection
types:![]() - Unknown (generally shown immediately after reboot)
- Unknown (generally shown immediately after reboot)![]() – Ethernet
– Ethernet![]() – HomePlug power-line communication
– HomePlug power-line communication![]() – WiFi adapter
– WiFi adapter
• Connection Strength – Signal/link quality. A single dot indicates 0% signal. The taller the bar, the
stronger the signal.
• Page – The active displayed page and total number available (active/total). You may scroll through
pages displayed by moving the control toggle left or right.
Registers
Registers is essentially the “default” state for the LCD. When this option is selected, the LCD will scroll
through every register configured in the eGauge device web interface under Settings → LCD along with
the device hostname and current IP address. The active page number is shown in the top right corner of the
display. Note that the registers displayed will vary from device to device, depending on configuration.

Figure 3: Example of scrolling progression in Register view
Info
The Info section contains device-specific data. This data may be useful for troubleshooting. As some of
this data may be sensitive (particularly the MAC address), it should not be shared with anyone other than
eGauge technical support and individuals who are authorized to make configuration changes to the eGauge.
The available information is summarized below:
- Name – eGauge hostname. A unique name identifying the eGauge. This can be
used to access the eGauge remotely, using a URL in the form http://DEVNAME.
egaug.es where DEVNAME is replaced with the hostname as shown here. Note:
the eGauge must be configured for and connected to the d.egauge.net proxy-server
for remote communication. - Model – The model number of the eGauge. This may be useful for troubleshooting
purposes (different models may have different troubleshooting steps) and identifying
the capabilities of the hardware (some models may have features that others lack). - Serial # – A unique identifying serial number, guaranteed not to change. This
is generally not needed by the end user, but it may be requested by eGauge technical
support or sales. This serial number matches the sticker on the device exterior. - IP Address – Current IP address of the eGauge on the local network. A user can
connect to the eGauge using this address provided the computer being used is on the
same network as the eGauge. This address may change depending on the network
and connection method used. - MAC – the MAC address of the communication interface in use by the
eGauge. This will change depending on the type of connection in use. This will not
be the same MAC address required for registration purposes or remote configuration
assistance if an external USB adapter is in use. - Time – the current system time set on the eGauge. The eGauge should automatically
obtain the correct time via NTP, but in cases where it cannot the system time can be
verified here. - Date – the current date set on the eGauge. The eGauge should automatically obtain
the correct date via NTP, but in cases where it cannot the date can be verified here. - Board Temp – internal temperature of the eGauge. Not the same as ambient temperature.
- Board Humidity - internal humidity level of the meter. Note that this is not ambient humidity, but the detected humidity level on the eGauge circuit board. This feature is only available on meters equipped with this sensor.
- Firmware – current firmware version. Firmware release notes are available at: http://egauge.net/revs.
- Kernel – current kernel version. Generally not required, updated along with firmware
when required.
Tools
- CTid - can be used to blink the LED on a CTid sensor connected to a chosen port. Toggle the selection switch left and right to scroll through the port numbers. Press to start blinking when the desired port is displayed. Pressing a second time will stop the blinking and exit back to the Tools menu.
- Reboot - reboots the eGauge. The same thing as Tools → Reboot. Useful for troubleshooting purpose
- FW Update – allows the user to update to the latest firmware. Firmware release notes
are available at http://egauge.net/revs/. Note: This tool requires Internet connectivity to the meter. - Factory Reset – resets all settings on the eGauge to factory defaults. Warning – this
will cause a loss of data recorded on the device. Depending on the network settings,
it may also prevent the eGauge from connecting to the local network or proxy server
again. Care should be taken when using this option.
Settings
Certain settings can be modified directly through this menu. The Settings menu is broken down into three
subcategories – Display, HomePlug, and Wireless.
Display
LCD display settings are configured here.
- Contrast - controls the LCD contrast level. Range from 0-80%
- Brightness – controls the LCD backlight brightness. Range from 0-100% in 20%
increments. - Duration – the amount of time until the backlight turns off, measured from the last
input on the control toggle. Can be set to “always” (backlight always off), “after 30s”,
“after 1m”, “after 5m”, “after 1h”, and “never” (backlight always on). - Font – font size used by the eGauge LCD. Can be set to “small”, “normal”, or “large”.
- Orientation – display orientation. Since the eGauge can be mounted in a variety
of ways, this can make the display easier to read. Can be set to “normal”, “counter
clock-wise”, “upside-down”, or “clockwise”. - Timezone – timezone used by the LCD display and eGauge. This reflects the device
interface option Settings → Date & Time → Time Zone.
HomePlug
HomePlug functionality can be accessed through this menu. Note that the “Join others” option will only
attempt to pair with HomePlug adapters or eGauges currently in join mode themselves. If no HomePlug
adapters or eGauges are present and in join mode, it will time out.
- Status – shows the current status of the HomePlug interface. This may take up to 30
seconds to fully load. If the eGauge is connected to one or more HomePlug adapters,
this will return “Status: member”. Otherwise, it will return “Status: alone”. - Join Others – attempts to pair with another nearby HomePlug adapter for 240 seconds. Make sure to randomize (using Random PW, see below) first. Returns “Status:
member” if successful, otherwise returns “Status: timed out” - Random PW – randomizes the HomePlug encryption key on the eGauge, causing
it to leave any HomePlug network it may have been connected to. Should always
returns “Status: alone” - Default PW – sets the HomePlug encryption key on the eGauge to the protocol default of “HomePlugAV”. This allows the eGauge to communicate with any HomePlug
adapter or eGauge using factory default settings. Will return “Default PW set” when
successful.
Wireless
If using an EG42xx model meter, wireless functionality can be accessed through this menu. When using
WPS, access to the wireless router is required.
Status – shows the status of the WiFi interface. This may take up to 30 seconds to load.
- If the eGauge is connected to a WiFi network, “Connected to ” is displayed.
- If no wireless adapter is detected, “No WLAN device” is displayed.
- If the eGauge has a wireless adapter, but not configured for a WiFi network, “Status: inactive” is displayed.
- If a network is configured but can’t be found, or the password is wrong, “status: scanning” may be displayed.
Setup via AP - Activates the EG42xx access point for 60 minutes to allow for wireless connectivity to the meter interface. For details on connecting to the EG42xx Access Point please see: EG42xx Wifi Connection
- If the eGauge is not connected to a WiFi network the Access point will broadcast and the LCD will display the SSID and the number of seconds remaining before the AP automatically deactivates.
- If the eGauge is connected to a WiFi network already, you will be asked if you want to disconnect from the Wifi network. Choose No to leave the meter connected, choose Yes if you want the meter to disconnect and activate the Access point functionality.
- While the meter is in the process of connecting to a Wifi network "connecting" is displayed along with the number of seconds remaining until the eGauge stops trying to connect to the chosen WiFi network.
- If the eGauge is unable to connect to the local WiFi network, "Timed out" is displayed.
WPS Setup – connects the eGauge to a router using WPS push-button pairing. To perform WPS setup, consult your router’s manual. Generally this process requires holding a button labeled “WPS” on your router between 1 and several seconds, then initiating the “WPS Setup” function on the eGauge.
- If the eGauge successfully connects to a network, “Connected to ” will be displayed
- If already configured for a WiFi network, “Disconnect first” will be displayed. Navigate to Settings → Wireless → Disconnect to disconnect before joining.
- If the eGauge can’t find a router to pair WPS with, it will display “Status: timed out”. This may be due to the router being out of range, or never being put into WPS pairing mode.
- If no WiFi adapter is found, “No WLAN device” is displayed.
Disconnect – Reset the WiFi configuration, forgetting any networks it has been configured to connect to.
- Forgetting all networks should return “Success”.
- If no wireless adapter is found, “No WLAN device” is displayed.
- If no wireless network has been configured, “Already disconnected” is returned.