# JSON WebAPI
Information about the eGauge meter's JSON-based API
# Introduction
The WebAPI documentation may be found at egauge.net/support/webapi.
The Web API was introduced in firmware v.4.2, however eGauge Systems periodically releases new firmware versions with bug fixes, enhancements,
and new features to the WebAPI. It is recommended to use the latest eGauge firmware version.
Click here for information about checking and upgrading eGauge meter firmware.
Be sure to select the appropriate firmware version in the WebAPI documentation for your meter
in the upper left-hand corner of the documentation system.
By default, the WebAPI documentation defaults to information about the latest stable
firmware release.
The eGauge WebAPI is a JSON-based API framework that allows for automated meter configuration,
recorded data retrieval, status information, and more.
eGauge Systems provides a Python library to assist with authentication and other interactions with the eGauge
meter WebAPI and can be installed from from [PyPi](https://pypi.org/project/egauge-python/) (pip) or [Bitbucket](https://bitbucket.org/egauge/python/src/main/) (source code) .
#### Getting Started With Python
To make it easy to get started, eGauge provides an open source Python package. It can be installed with the command:
`pip install egauge-python`
With this package installed, accessing an eGauge meter becomes very simple.
For example, to fetch the hostname of the meter, you could use:
```python
from egauge import webapi
URI = "https://DEV.egaug.es" # replace DEV with meter name
USR = "USER" # replace USER with user name
PWD = "PASS" # replace PASS with password
dev = webapi.device.Device(URI, webapi.JWTAuth(USR,PWD))
print("hostname is " + dev.get("/config/net/hostname")["result"])
```
The package also contains various convenience classes to read meter data, capture waveform samples,
convert between physical units, and so on.
The official GIT repository for this package is at
[https://bitbucket.org/egauge/python/](https://bitbucket.org/egauge/python/).
Various code examples can be found in the
[examples directory](https://bitbucket.org/egauge/python/src/main/examples/).
#### Getting started without the eGauge Python library
Check out the support library page on
[WebAPI Authentication](https://kb.egauge.net/books/egauge-meter-communication/page/authentication)
for examples on authentication.
#### Common WebAPI service descriptions
See the [WebAPI documentation](https://webapi.redoc.ly) for full details and all service
endpoints available. The endpoints below are only several commonly accessed endpoints that retrieve
data and configuration.
##### [`/auth`](https://webapi.redoc.ly/stable/tag/auth)
Service used to obtain or invalidate a JSON web token used for authenticating with the WebAPI.
##### [`/config`](https://webapi.redoc.ly/stable/tag/config)
The `/config` service allows you to read and write configuration to the meter.
##### [`/register`](https://webapi.redoc.ly/stable/tag/register)
The `/register` service provides instantanoues and historical _register_ data that is recorded
on the meter.
##### [`/local`](https://webapi.redoc.ly/stable/tag/local)
The `/local` service provides instantaneous information derived from configured channel inputs,
including RMS value, mean value, frequency value and instantanoues power and energy values if
power registers are configured.
For historical or newly generated register data, use the `/register` service.
#### Other WebAPI service descriptions
Below are the additional service endpoints not listed above. See the
[WebAPI documentation](https://webapi.redoc.ly) for full details and all service
endpoints available.
##### [`/capture`](https://webapi.redoc.ly/stable/tag/capture)
The `/capture` service is used for obtaining raw waveform data from the inputs. To obtain normal
RMS, mean or frequency from the sensors directly, use the `/local` service. For obtaining stored or
newly generated _register_ data, use the `/register` service.
##### [`/cmd`](https://webapi.redoc.ly/stable/tag/cmd)
Service used to send commands to the meter such as reboot or firmware upgrade.
##### [`/ctid`](https://webapi.redoc.ly/stable/tag/ctid)
Service used to read or configure CTid sensors from a meter or flash the LED on the sensor (EG4xxx only).
##### [`/ctrl`](https://webapi.redoc.ly/stable/tag/ctrl)
Service used for controlling supported remote devices, such as the PRM3 relay module.
##### [`/log`](https://webapi.redoc.ly/stable/tag/log)
Service used to access syslog or kernel logs. Syslog must be enabled through the `/config` service
endpoint first.
##### [`/lua`](https://webapi.redoc.ly/stable/tag/lua)
Service used for managing Lua scripts on the meter.
##### [`/providers`](https://webapi.redoc.ly/stable/tag/providers)
Service used for obtaining information about third-party providers that support meter services
such as push data sharing, push alerts, and tariffs.
##### [`/store`](https://webapi.redoc.ly/stable/tag/store)
Service used for storing and retrieving preferences and other settings typically used in
the user's web browser interface.
##### [`/remote`](https://webapi.redoc.ly/stable/tag/remote)
Service used for configuring remote devices on the meter.
##### [`/sys`](https://webapi.redoc.ly/stable/tag/sys)
Service used to obtain system information such as firmware version, uptime, serial number,
meter model, and more.
# Firmware Versions and API Access
Firmware versions and relase notes may be found at
egauge.net/revs
### Minimum firmware version
The eGauge JSON-based WebAPI was introduced in meter firmware v4.2. However, it is recommended
to use the most recent meter firmware as there have been multiple bug fixes and features added,
as there may continue to be in the future.
### Checking and upgrading firmware
Meter firmware upgrades are designed to be easy and require just a few mouse clicks, no searching
for model numbers or having to download files or software! For information about checking and upgrading the
meter's firmware, please see
[this article](https://kb.egauge.net/books/egauge-meter-ui/page/checking-and-upgrading-firmware).
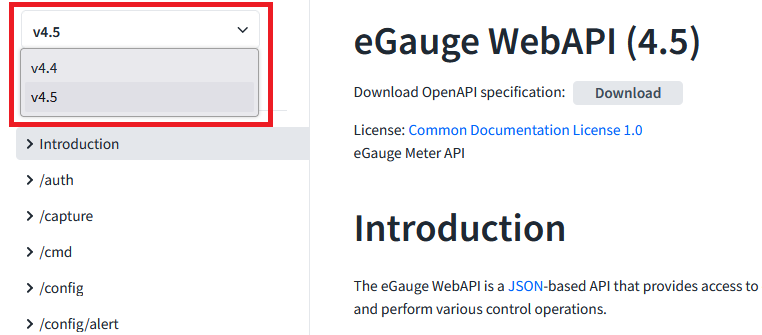
### Changing WebAPI documentation version
The WebAPI documentation is version-controlled and older versions of the WebAPI documentation
can be viewed by changing the version selector in the upper left-hand corner of the WebAPI
documentation page:
[](https://kb.egauge.net/uploads/images/gallery/2023-11/image-1699655322289.png)
This, for example, allows you to see only the API endpoints and features available in a given
firmware. If the specific firmware version documentation does not exist, choose the closest
lower-numbered release. For example, if the meter firmware is v4.4.2, the correct documentation
version in the screenshot is v4.4.
However, it is recommended to use the latest meter firmware release as there may be periodic
bug fixes and improvements.
# Authentication
View the `/auth` section information in the [WebAPI documentation](https://egauge.net/support/webapi)
for full details on the authentication methods of the eGauge meter WebAPI.
The eGauge WebAPI uses JSON web token (JWT) authentication for all interactions. An "Authorization"
header must be provided with WebAPI requests in the format of `Authorization: Bearer JWT` where
`JWT` is a valid JSON web token.
Tokens typically expire after 10 minutes and need to be renewed periodically.
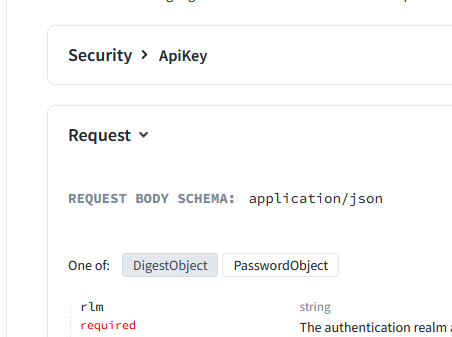
There are two methods to obtaining a token:
1) Digest Object. This is the recommended method for obtaining a JWT and is described in this document.
This method is similar to the HTTP Digest authentication method.
2) Password Object. This method sends the credentials as plaintext, and therefore requires a secure
connection, e.g., HTTPS to the local IP address of the meter. This method will return an error
if attempted over the eGauge proxy server, even if HTTPS is used.
You may find more information about the authentication methods by clicking the object you wish
to use in the [WebAPI documentation](https://egauge.net/support/webapi) `/auth` section:
#### Digest Authentication workflow
1. Send a GET to /auth/unauthorized to get a 401 to get the realm (`rlm`) and server nonce (`nnc`)
2. Generate a client nonce (`cnnc`)
3. Calculate `hash` in the format:
`ha1 = MD5(usr:rlm:pwd)`
`hash = MD5(ha1:nnc:cnnc)`
where `usr` and `pwd` are a valid user and password on the meter
4. Send `rlm`, `usr`, `nnc`, `cnnc` and `hash` to /auth/login for the token
#### Digest Authentication in Python
eGauge Systems provides a Python library with helper functions to deal with authentication
and other interactions. See the
[WebAPI introduction](https://kb.egauge.net/books/egauge-meter-communication/page/introduction)
page for more information.
```python
#!/usr/bin/env python3
# Example Python script obtaining a JSON web token (JWT) from a meter's WebAPI.
# JWTs are needed for any interactions with the meter's JSON-based WebAPI.
# eGauge provides a Python library that handles authentication automatically and
# provides additional helper functions. It may be found on Bitbucket or PyPi
# https://bitbucket.org/egauge/python/src/master/egauge/
# https://pypi.org/project/egauge-python/
# Main WebAPI documentation: https://egauge.net/support/webapi
import requests
import hashlib
from secrets import token_hex
# meter and credential information
URI = "https://eGauge67385.d.egauge.net"
USER = "admin"
PASS = "as$kS2345da2@4vK9"
# get realm (rlm) and server nonce (nnc):
auth_req = requests.get(f"{URI}/api/auth/unauthorized").json()
realm = auth_req["rlm"]
nnc = auth_req["nnc"]
cnnc = str(token_hex(64)) # generate a client nonce (cnnc)
# generate our hash
# ha1 = MD5(usr:rlm:pwd)
# hash = MD5(ha1:nnc:cnnc)
ha1_content = f"{USER}:{realm}:{PASS}"
ha1 = hashlib.md5(ha1_content.encode("utf-8")).hexdigest()
hash_content = f"{ha1}:{nnc}:{cnnc}"
hash = hashlib.md5(hash_content.encode("utf-8")).hexdigest()
# Generate our payload
payload = {
"rlm": realm,
"usr": USER,
"nnc": nnc,
"cnnc": cnnc,
"hash": hash
}
# POST to /auth/login to get a JWT
auth_login = requests.post(f"{URI}/api/auth/login", json=payload).json()
rights = auth_login["rights"] # rights this token has (save, control, etc)
jwt = auth_login["jwt"] # the actual bearer token
print(f"Got token with rights {rights}.")
# We can verify this token works.
# Add an authorization header with our token and make a request
headers = {"Authorization": f"Bearer {jwt}"}
api_request = requests.get(
f"{URI}/api/config/net/hostname",
headers=headers,
)
# {'result': 'eGauge67385'}
print(api_request.json())
# This token may be used until it expires, in which case a 401 response will be
# returned, to which this process can be reperformed.
```
#### Digest Authentication with Bash
This bash script uses curl and jq to obtain a JWT for use with the WebAPI.
```bash
URI="https://eGauge67385.d.egauge.net"
USER="admin"
PASS="as$kS2345da2@4vK9"
auth_req=$(curl -s "$URI/api/auth/unauthorized")
rlm=$(jq -r '.rlm' <<< $auth_req)
nnc=$(jq -r '.nnc' <<< $auth_req)
cnnc=$(openssl rand -hex 64)
ha1=$(echo -n "$USER:$rlm:$PASS" | md5sum | cut -f1 -d" ")
hash=$(echo -n "$ha1:$nnc:$cnnc" | md5sum | cut -f1 -d" ")
auth_login=$(curl -s -X POST "$URI/api/auth/login" \
-H "Content-Type: application/json" \
-d "{\"rlm\": \"$rlm\", \"usr\": \"$USER\", \"nnc\": \"$nnc\", \"cnnc\": \"$cnnc\", \"hash\": \"$hash\"}")
jwt=$(jq -r '.jwt' <<< $auth_login)
api_request=$(curl -s "$URI/api/config/net/hostname" -H "Authorization: Bearer $jwt")
echo $api_request
```
# Register Data Examples
This page contains a few basic examples of obtaining historical register data from an eGauge meter using the WebAPI.
These examples use the
[eGauge Python library](https://kb.egauge.net/books/egauge-meter-communication/page/introduction)
but other languages and libraries may be used.
### Get Instantaneous values
Request: `dev.get('/register?reg=3+5+7+9&rate')`
Parameters:
`reg=3+5+7+9` asks for those register IDs
`rate` asks for the instantaneous rate of change at the time
No `time` parameter was provided, so it gets the latest value
Response:
```python
{
"ts": "1679506470.000420096",
"registers": [
{"name": "Panel 3 Mains", "type": "P", "idx": 3, "did": 0, "rate": 2400},
{"name": "Panel 3 L1", "type": "P", "idx": 5, "did": 2, "rate": 551},
{"name": "Panel 3 L2", "type": "P", "idx": 7, "did": 3, "rate": 1080},
{"name": "Panel 3 L3", "type": "P", "idx": 9, "did": 4, "rate": 769},
],
}
```
### Get 6 hour period of historical data
Request: `dev.get('/register?reg=3+5+7+9&rate&time=1672556400:3600:1672578000')`
Parameters:
`reg=3+5+7+9` asks for those register IDs
`rate` asks for the instantaneous rate of change at the time
`time=1672556400:3600:1672578000` is:
- `1672556400`: Jan 1 12:00AM (start time)
- `3600`: number of seconds to skip between rows (makes 1 hour granularity)
- `1672578000`: Jan 2 6:00AM (end time)
Response:
```python
{
"ts": "1679505959.000420096",
"registers": [
{"name": "Panel 3 Mains", "type": "P", "idx": 3, "did": 0, "rate": 4185},
{"name": "Panel 3 L1", "type": "P", "idx": 5, "did": 2, "rate": 506},
{"name": "Panel 3 L2", "type": "P", "idx": 7, "did": 3, "rate": 2902},
{"name": "Panel 3 L3", "type": "P", "idx": 9, "did": 4, "rate": 777},
],
"ranges": [
{
"ts": "1672578000",
"delta": 3600.0,
"rows": [
["150555067851", "64158660544", "57705425071", "28690982234"],
["150552980706", "64157713471", "57704901028", "28690366205"],
["150550413006", "64156764160", "57703892567", "28689756277"],
["150548310776", "64155810457", "57703366875", "28689133443"],
["150546201980", "64154853051", "57702841741", "28688507186"],
["150543949276", "64153896433", "57702279596", "28687773245"],
["150541826993", "64152938219", "57701751003", "28687137769"],
],
}
],
}
```
#### Notes
Parse output the same way that would be done for XML data.
Each row is _delta_ seconds (3600) older than the previous row.
The columns are in order of the registers, that is the first value in each row is for
"Panel 3 Mains", the second value in each row is for "Panel 3 L1", and so on.
Row 1:
150555067851 is the cumulative value of "Panel 3 Mains" at time "ts" (1672578000 = Jan 1 6:00AM)
64158660544 is the cumulative value of "Panel 3 L1" at time "ts" (1672578000 = Jan 1 6:00AM)
57705425071 is the cumulative value of "Panel 3 L2" at time "ts" (1672578000 = Jan 1 6:00AM)
Row 2:
150552980706 is the cumulative value of "Panel 3 Mains" at time "ts"-"delta"\*1 (1672578000-3600\*1 = Jan 1 5:00AM)
Row 3:
150550413006 is the cumulative value of "Panel 3 Mains" at time "ts"-"delta"\*2 (1672578000-3600\*2 = Jan 1 4:00AM)
Row 4:
150548310776 is the cumulative value of "Panel 3 Mains" at time "ts"-"delta"*3 (1672578000-3600\*3 = Jan 1 3:00AM)
Row 7:
28687137769 is the cumulative value of "Panel 3 L3" at time "ts"-"delta"\*6 (1672578000-3600\*6 = Jan 1 12:00AM)
For example, "Panel 3 Mains", between 12:00AM and 6:00AM on Jan 1 used (150555067851-150541826993)/3,600,000 == 3.679 kWh
### Get 3 particular timestamps
Request: `dev.get('/register?reg=3:5&time=1672556400,1672642800,1672729200')`
Parameters:
`reg=3:5` asks for registers starting at ID 3 and ending at ID 5
`time=1672556400,1672642800,1672729200` requests the values at timestamps of:
- `1672556400`: Jan 1 12:00AM
- `1672642800`: Jan 2 12:00AM
- `1672729200`: Jan 3 12:00AM
Response:
```python
{
"ts": "1679507855.000420096",
"registers": [
{"name": "Panel 3 Mains", "type": "P", "idx": 3, "did": 0},
{"name": "Panel 3 Mains*", "type": "S", "idx": 4, "did": 1},
{"name": "Panel 3 L1", "type": "P", "idx": 5, "did": 2},
],
"ranges": [
{
"ts": "1672556400",
"delta": 60.0,
"rows": [["150541826993", "182491473811", "64152938219"]],
},
{
"ts": "1672642800",
"delta": 60.0,
"rows": [["150591166950", "182556552340", "64175776009"]],
},
{
"ts": "1672729200",
"delta": 60.0,
"rows": [["150704245365", "182691087288", "64205578174"]],
},
],
}
```
#### Notes
Parse the same as XML output. There are 3 ranges, one for each of the requested timestamps, and each
register's cumulative value at that time.
For example:
The last range shows on January 1 ("ts" of 1672729200) that "Panel 3 L1\*" (middle column)
had a cumulative value of 64205578174 watt-seconds.
The second to last range shows on January 2 ("ts" of 1672642800) that "Panel 3 L1\*" (middle column)
had a cumulative value of 64175776009 watt-seconds.
This means between January 1 and January 2, the "Panel L1" register changed by
(64175776009-64205578174) = -29802165 watt-seconds, which is -29802165/3600000 = -8.27 kWh
Depending on the orientation of the amperage sensor (CT), the power/energy will register as
positive or negative. If there is unidirectional power (no back-feeding, etc.) it is usually
safe to take the absolute value between dates. However, unexpected power polarity can also be
caused by physical installation issues that are generating innacurate data.
# Technical Documentation
The latest eGauge meter WebAPI documentation may be found at [egauge.net/support/webapi](http://egauge.net/support/webapi)