Choose the lowest check frequency possible as evaluating too many conditions too often may slow down the device. If a slow-running condition (eg, a condition using the peak\_risk() function) is evaluated, evaluation of other conditions may be delayed until the evaluation of that condition is completed.
**Msg (Message):** use this field to define a custom-message to be displayed along with the alert name. If left empty, a default message is included which shows the value of the lhs, the operator, and the rhs of the trigger-condition. A well-written message will explain the alert - for example, on a "Low Production" alert the message might be "Caution: Low production on Inverter 1 (north side)". The placeholders `%l` and `%r` can be used in the message field to include the calculated value for the lhs and rhs of the equation.Examples of user-defined alerts are available in the [User-defined Alert Examples](#h_98585608921598384978268) section near the end of this document. Click [here](#h_98585608921598384978268) to jump to that section.
### Viewing and Acknowledging Alerts You can view and acknowledge alerts on your device under **View → Alerts**. By default, a list of triggered alerts will be visible. For more information on each alert and the option to acknowledge or delete an alert, click the "View Privileged Details" button. [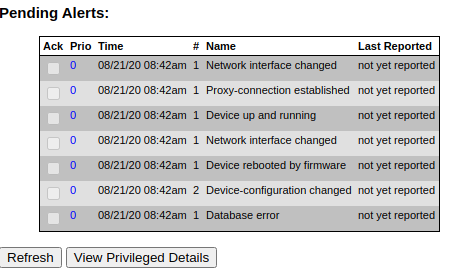](https://kb.egauge.net/uploads/images/gallery/2020-08/image-1598384378068.png) **Ack (Acknowledged):** indicates if this alert has been acknowledged. Once acknowledged, the alert will be reported again should it reoccur and its priority is sufficiently high. Alerts are automatically acknowledged after 24 hours. To ensure new alerts are reported, alerts should be acknowledged when they are received. **Prio (Priority):** the priority of the corresponding alert. **Time:** date and time of the most recent occurrence of the alert. **\#:** number of times this alert has occurred (note that this isn't necessarily the number of times the alert has occurred since the device was installed). **Name:** name of the alert. **Last Reported:** date and time when the alert was last reported to at least one of the alert-destinations. To view detailed alert information as well as acknowledge and delete reported alerts, click the "View Privileged Details" button. Valid credentials are required to see this information and acknowledge/delete alerts. [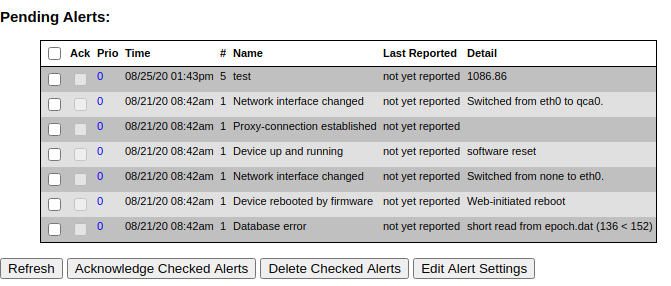](https://kb.egauge.net/uploads/images/gallery/2020-08/image-1598384643646.png) The **Detail** column contains additional information about each alert. For example, one instance of the "Network interface changed" alert provides the additional detail that the network interface was changed from "none" to "eth0" (this happens immediately after a reboot) while the other (newer) instance of the "Network interface changed" alert provides the additional detail that the network interface changed from eth0 to qca0. This happened very quickly (within the same minute), and is normal behavior for a meter coming back online after a reboot. To modify alerts, check off any alerts you wish to delete or acknowledge, and click the appropriate button. Deleting alerts here will remove them from the reported alert page until it occurs again. ### User-defined Alert ExamplesFor available functions on your particular firmware version, visit http://**DEVNAME**/fundoc.html?alert where DEVNAME is your eGauge [device name](https://kb.egauge.net/books/general/page/where-can-i-find-my-device-name "Where can I find my device name?").
##### General Notes `$"REG NAME"` returns the instantaneous value of the register REG NAME, while `"REG NAME"` points a function at a specific register (but doesn't necessarily return the register's value). When using functions such as avg() or others listed in the function documentation, **do not** include the dollar sign. When creating a message (Msg), there are several shortcuts which can be used to include values from the alert condition itself: `%l` will return the value of the left–hand–side `%L `will return the formula of the left–hand–side `%r` will return the value of the right–hand–side `%R` will return the formula of the right–hand–side `%%` will return a single percent sign (eg, %l %% would read as <value from left side of the comparison> %) ##### Basic Examples In the following example, "Grid Average" will return the daily average of the Grid register if that value is less than or equal to 5000W, while "Grid Instantaneous Usage" will return the instantaneous reading of the Grid register if that value is less than or equal to 1000W. [](https://kb.egauge.net/uploads/images/gallery/2020-08/image-1598385221466.png) The next example will trigger if the value of the L1 voltage register is greater than or equal to 130V (which could indicate a dangerous condition for devices connected to that service). [](https://kb.egauge.net/uploads/images/gallery/2020-08/image-1598388200742.png) More complex math can also be performed on either side of the alert expression. For example, the following alert obtains the average voltage from two references, and triggers if that value is greater than or equal to 130V. [](https://kb.egauge.net/uploads/images/gallery/2020-08/image-1598388449822.png) It's also possible to calculate cumulative values (kWh) over a period and trigger an alert based on those values. In the following example, let's assume an outdoor hot tub has a 6kW pump/heater, which cycles every 3 hours for 30 minutes at a time. Thus, every 6 hours there should be 6 kWh of energy used. Any less could indicate a pump or heater failure, and the hot tub could freeze. `(avg("Hot Tub Pump/Heat",360)*6) / 1000` will take the average power (W) read on the register Hot Tub Pump/Heat over the last 360 minutes (60 minutes in an hour, 6 hours). Then, the average power is multiplied by 6 hours to get Wh, the total energy used over the 6 hour period. Finally, we divide by 1000 to convert Wh to kWh. That value is then compared to the value on the right-hand-side, in this case 6. If the alert is triggered the alert will be sent. [](https://kb.egauge.net/uploads/images/gallery/2022-03/image-1646775756987.png) ##### Ternary operator The syntax of the “?” ternary operator (also referred to as a conditional or conditional test) is `condition?value_if_true:value_if_false` and can be nested. This is a fundamental component of many alerts, especially more complex alerts. ##### Boolean expressions Simple boolean expressions may be used within an alert: `(5 > 4)` will return 1. Conversely, `(5 < 4)` will return 0. The boolean value can be multiplied by another value (including a register value). For example, `($"Grid" < 7000) * $"Grid"` returns the value of “Grid” if “Grid” is greater than 7000 W, and returns 0 if the value of "Grid" is less than 7000W. To break this down: if `$"Grid" < 7000` is true, it will return a 1. `1 * $"Grid"` returns the value for the "Grid" register. If `$"Grid" < 7000` is false, it will return a 0. `0 * $"Grid"` is 0. Remember, `$"REGNAME"` returns the instantaneous value of the register. Let's look at how the `time()` function can be used with the ternary operator and boolean expressions to trigger an alert at a specific time: [](https://kb.egauge.net/uploads/images/gallery/2020-08/image-1598387960751.png) These two alerts work together to trigger if the Grid value is greater than 5000W during daytime hours and greater than 3000 during nighttime hours. time() returns the current time as a number from 0 up to (but not including) 24 with minutes as a fractional value. For example, 11:30am would be 11.5. We use two booleans here: `time() > 8 * time() < 18` If the time is > 8 (8am) and less than 18 (6pm), the booleans work out to 1 \* 1 or 1. If either boolean is false, the output from the booleans is 0. 0 \* 1 or 1 \* 0 both equal 0. This gives us a ternary expression of either `1 ? $"Grid" : 0` or `0 ? $"Grid" : 0` (remember ternary expressions work out as `condition?value_if_true:value_if_false`). Thus, if the booleans evaluate to 1, the left side of the formula returns the value of $"Grid". If the booleans evaluate to 0, the left side of the formula returns 0. Moving on to the alert expression: if the booleans work out to zero (ie, if the time range is not correct), the left side of the alert returns 0. This can never be greater than 5000, so the alert never triggers. If the booleans work out to 1, the left side of the alert returns the value of the "Grid" register. If the value of the "Grid" register is >= 5000, the alert triggers. ## Example and description of POST data `{{@425}}` # Example and description of JSON alert POST data ``` { "now": "1568419537.35", "alerts": [ { "id": 1804290019, "priority": 7, "occurrences": 12, "first_occurence": 4462.5, "last_occurence": 389.31, "name": "Device-configuration changed", "detail": "By owner." }, { "id": 1804290035, "priority": 0, "occurrences": 1, "first_occurence": 0, "last_occurence": 0, "name": "Device rebooted by firmware", "detail": "Howdy do?" } ] } ``` - `now` is a 64-bit UNIX timestamp, possibly with a fractional (sub-second) part, formatted as a decimal integer string. - `alerts` is a list of reported alerts: - `id` is a number that uniquely identifies an alert. It is used, for example, to acknowledge or clear an alert. - `priority` is the user-assigned priority level of the alert (0 being the lowest priority and 7 the highest priority). - `occurrences` gives a count of how many times the alert has occurred since it was last cleared. - `first_occurence` and `last_occurence` specify how many seconds ago the alert occurred for the first time and the last time, respectively, relative to `now`. That is, the specified number should be subtracted from `now` to get the absolute UNIX timestamp of when the alert occurred first and last, respectively. - `name` is the name of the alert that occurred. - `detail` provides additional detail on the alert that occurred. # Zero out data/spikes tutorial Devices on firmware older than [version 3.01](https://www.egauge.net/revs/#3.01) may experience a phenomenon where register configuration changes that require a reboot cause unusually high readings to appear in the minute following the change. These readings are referred to as spikes, since they tend to "spike" far above the actual device readings. Spikes are almost always at least 100x the expected reading, and may be even higher. Since spikes can cause cumulative readings to display incorrectly, the eGauge has a tool that can **permanently clear data** from the device database. Extreme caution should be exercised when using this tool. Once data is erased, it cannot be recovered. The video tutorial below provides a walkthrough of the tool's functionality. Note that this tool may be used in other situations where clearing data is necessary (for example, removing bad data due to a configuration issue). However, this tool will **always permanently clear data** when used. # eGauge language options and adding new languages The EG30xx and EG4xxx have support for different locales. The eGauge will use the language associated with the locale that is requested by the user's browser. If the locale does not exist or is not supported, it will default to English. New locales and improvements upon existing ones are welcome. Please see our internationalization (I18N) page at [https://www.egauge.net/i18n/](https://www.egauge.net/i18n/) for full details. This page also shows the completion percentage of any supported language. Anyone is welcome to download and improve upon the PO files and submit them to| [](https://www.egauge.net/media/support/docs/egauge-tutorial-article-7-IE10-11.pdf) [IE 10/11 PROXY SETTINGS](https://www.egauge.net/media/support/docs/egauge-tutorial-article-7-IE10-11.pdf) |
Warning: Systems greater than 600V phase-to-phase are not fully supported by eGauge Systems. Supported CTs are rated for up to 600Vac, systems at higher voltages will need to source alternate CTs.
Amperage-output CTs (e.g., 5A output, or 100:5 ratio, etc) can cause serious shock or electrocution. Use appropriate protection when installing and handling equipment. **Amperage-output CTs must not be connected directly to the eGauge meter and may cause damage**.
#### Monitoring High Voltage SystemseGauge Systems cannot guarantee meter accuracy when third party potential transformers are used. It is recommended to use the **[EV1000 high voltage sensor](https://kb.egauge.net/books/egauge-hardware-product-pages/page/egauge-high-voltage-sensor-ev1000)** when measuring a system with higher voltage than the eGauge meter rating, or on a different side of a transformer from where the eGauge voltage taps are connected.
As with all physical registers, a monetary register will only record values from the time it is created moving forward.
### Creating a monetary register formulaIt's strongly recommended to use a plain text editor (notepad, nano, vim, etc). Other software may add formatting characters which can cause issues.
At the most basic level, a monetary register multiplies the value of an arbitrary power register or set of power registers against one or more cost per kWh values. The monetary register is expressed in terms of currency units per second (eg, dollars, pounds, euros, etc). To convert from currency per kWh to currency per second, the final step of any monetary register calculation is to divide by 3.6e6 (or 3600000). Here's a basic example: `($"Grid"*.25)/3.6e6` This example would effectively be the same thing as setting the "Average cost of 1kWh of electricity" to .25, except you can use *any arbitrary register* in the calculation (meaning you're not limited to using the Usage totaling register). For example, you could add two registers together: `(($"Subpanel1"+$"Subpanel2")*.25)/3.6e6` or multiply by some additional value: `(($"Grid"*2)*.25)/3.6e6` Monetary register formulas can also utilize some of the built-in eGauge functions (specifically time(), wday(), mday(), and month()) for tiered billing structures. For more information on these functions, refer to the function documentation on your specific meter by appending /fundoc.html? to the end of your meter URL (for example, DEVNAME.d.egauge.net/fundoc.html? where DEVNAME is the [device name](https://kb.egauge.net/books/general/page/where-can-i-find-my-device-name) of your meter).Available functions will vary from meter to meter depending on meter firmware version. It may be necessary to [update meter firmware](https://kb.egauge.net/books/egauge-meter-ui/page/checking-and-upgrading-firmware) to get access to certain functions. On meters connecting to eGauge.io this information will be available at: DEVNAME.egauge.io/fundoc.html
#### Basic Examples Let's start with a basic example - tiered billing with a higher peak rate between 5pm and 9pm. Standard 12am to 5pm; 9pm to 12am - $.15 / kWh Peak 5pm to 9pm - $.25 / kWh The eGauge features a full variety of comparison operators (=, <, >, <=, >=), so we'll use those along with the time() function.The time() function is based on the time zone set under **Settings -> Date & Time**
A comparison operator will return a 1 if true, or a 0 if false. Thus, we can use the following to test for the time range between 5pm and 9pm: `(time()>17)*(time()<21)` If both conditions are met, the result is `1*1`. If either condition is false, the result is `0*1` or `1*0` (`0` either way). Next, we'll use a conditional to return a value based on the time comparisons (expressed as `C ? T : F` where `C` is the condition, `T` is the value returned if true, and F is the value returned if false).Spaces in the formula are optional, and are ignored. In the examples below, spaces are used to improve readability.
`((time()>17)*(time()<21) ? ($"Grid"*.25) : ($"Grid"*.15))/3.6e6` This is the complete formula - we'll get the value of the "Grid" register multiplied by .25 and divided by 3.6e6 if the time is between 5pm and 9pm, and the value of the "Grid" register multiplied by .15 and divided by 3.6e6 if the time is outside of that range. #### Intermediate Example Moving on to a more complex example - it's possible to nest conditionals to perform more complex comparisons. Here's an example using time of day and day of week: Peak - 5pm-9pm M-F $.25 Peak Weekend - 4pm-10pm S-S $.32 Off Peak - 12am - 5pm; 9pm-12am M-F $.15 Off Peak Weekend - 12am-4pm; 10pm-12am S-S $.18 `((wday()<=4) ? ((time()>17)*(time()<21) ? ($"Grid"*.25) : ($"Grid"*.15)) : ((time()>16)*(time()<22) ? ($"Grid"*.32) : ($"Grid"*.18)))/3.6e6` Here, we've created a conditional which uses a comparison to see if `wday()<=4` (corresponding to a weekday). If it is a weekday, the first nested conditional runs to check the time and return a value based on the time; if it's a weekend, the second conditional runs a different time check and returns a different value based on the time. Finally, we divide by 3.6e6 at the end, which is always required. The following flowchart may better illustrate the logic behind this formula: [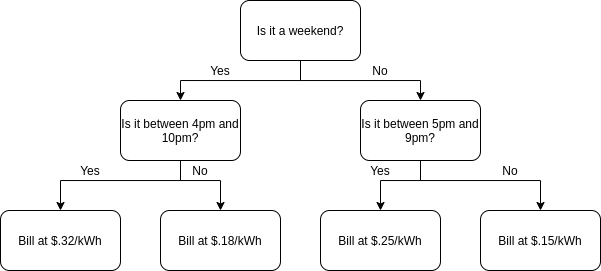](https://kb.egauge.net/uploads/images/gallery/2021-06/image-1623866302534.png)Formula registers have a finite length, meaning that extremely intricate billing schemes may not be supportable.
#### Advanced Example Building off of the previous example, let's say the utility also has an additional per-kWh charge from November thru May, and an additional flat daily rate: Peak - 5pm-9pm M-F $.25 Peak Weekend - 4pm-10pm S-S $.32 Off Peak - 12am - 5pm; 9pm-12am M-F $.15 Off Peak Weekend - 12am-4pm; 10pm-12am S-S $.18 Winter Peak Charge - Nov-May, $.08 per kWh Daily surcharge of $1.23 `((((month()<10)*(month()>4)) ? ((wday()<=4) ? ((time()>17)*(time()<21) ? ($"Grid"*.25) : ($"Grid"*.15)) : ((time()>16)*(time()<22) ? ($"Grid"*.32) : ($"Grid"*.18))) : ((wday()<=4) ? ((time()>17)*(time()<21) ? ($"Grid"*.33) : ($"Grid"*.23)) : ((time()>16)*(time()<22) ? ($"Grid"*.40) : ($"Grid"*.26))))+(1.23/86400))/3.6e6` We're building off of the previous formula in this example. We've used another conditional to test for the month of the year - if the month is > 4 (i.e., June 1) or < 10 (i.e., Nov 1) the meter uses the original formula in the Intermediate Example. If the month *isn't* within that range, the meter uses a modified version of the formula in the Intermediate Example (with rates adjusted upward by $.08 per kWh). Once a cost per kWh value is calculated, we take the calculated value multiplied by the actual register measurement and add 1.23/86400. We have a daily charge of $1.23, but the monetary value register expects *dollars per second*, not dollars per day. To convert $/s to $/d, we can divide by the number of seconds in a day (86400). The following flowchart may better illustrate the logic behind this formula: [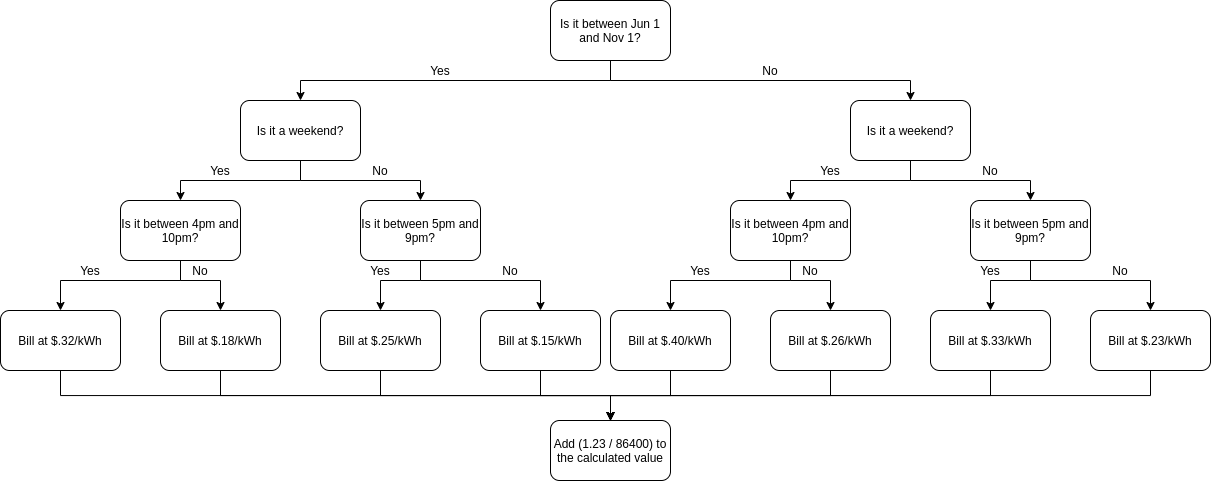](https://kb.egauge.net/uploads/images/gallery/2021-06/image-1624394505672.png) ### Using the monetary register Once a monetary register has been created and saved, navigate back to **Settings -> Preferences**. Scroll down to "Money used register" or "Money earned register" (based on whether the monetary register is used for consumption or generation billing) and select the appropriate register from the dropdown menu. [](https://kb.egauge.net/uploads/images/gallery/2021-06/image-1623866640275.png) Make sure to click "Save" at the bottom of the page to apply these changes. It's also possible to view the cumulative total (i.e., cost) recorded by a monetary register by displaying that register in the [Mobile-Friendly Dashboard UI](https://kb.egauge.net/books/egauge-meter-ui/page/dashboard). To do this, create a new "Summary Table" dashlet (or add a new register to an existing dashlet). Leave the Type as "Register value", name the dashlet as desired, select the monetary register in the "Register to display" field, and leave the unit as "auto". It may be necessary to flip the polarity of the reading to get a positive dollar value (using the "Flip sign of the value" option). This should result in something similar to the following: [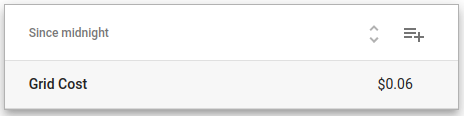](https://kb.egauge.net/uploads/images/gallery/2022-04/image-1649168885469.png) # Lua Scripting # Lua Scripting OverviewLua scripting is an advanced topic. eGauge Support cannot review code and has limited support for troubleshooting Lua scripts.
# Introduction Support for eGauge Script (eScript) was introduced in firmware v1.1, allowing limited scripting through the use of [formula registers](https://kb.egauge.net/books/advanced-egauge-operation/page/formula-registers-and-remote-devices). eScript was designed for calculating basic and common mathematical formulas such basic arithmetic operations, comparisons, and conditionals, along with the ability to call library routines (functions). Firmware v4.1 introduced [Lua v5.3](https://www.lua.org/manual/5.3/) support. To ensure safe operation, Lua execution is guarded with timeouts to protect against infinite loops or unacceptably long execution times. Additionally, a restricted set of standard libraries is supported. To maintain backwards compatibility, firmware transparently translates eScript expressions to Lua scripts before execution and the Lua execution environment provides all the functions available within eScript. # Lua Primer ## Lexical Conventions Names may consist of any letters, digits, or underscores but may not start with a digit. Numeric values use the same conventions as in most other languages, including the ability to write hexadecimal values with a prefix of 0x. The two boolean literal values are true and false. A variable with an undefined value is nil. Strings may be enclosed in double or single quotes. Characters within a string may be escaped with a backslash. Comments start with a double-dash (--) and extend to the end of the line. Statements may be terminated with a semicolon but, generally, semicolons are not required (even when there are multiple statements on a single line). The only exception to this rule is that a semicolon is required if the following statement starts with a left parenthesis. ## Variables Variables are global unless explicitly declared as local. For example: ```lua x = 10 -- global variable local y = 42 -- local variable ``` ## Operators Lua provides a normal set of operators for arithmetic operations and comparisons. A bit unusual is that the inequality operator is ~= rather than the more typical !=. Logical operators use keywords like in Python: and, or, and not. The length of a string or a table (see [Structured Data](https://kb.egauge.net/link/321#bkmrk-structured-data)) is obtained by prefixing the string or table name with a hash mark. \#'hi' would return 2, for example. Strings can be concatenated with the double-dot operator. 'yell'..'ow' would yield 'yellow', for example. ## Control Structures The syntax for the various control structures is: ```lua for index=initial,step,final do block end -- numeric for loop ``` ```lua for var in iterator do block end -- iterator for loop ``` ```lua while cond do block end -- while loop ``` ```lua repeat block until cond -- do while loop ``` ```lua if cond then block else block end -- conditional statement ``` You can use break to exit a loop but, unlike in C and other languages, there is no continue that would allow you to skip to the next iteration. ## Structured Data Lua uses tables to represent both arrays and hash tables (Python dictionaries, Javascript objects). For example: ```lua local a = {'a', 'b', 'c'} ``` assigns an array containing the strings 'a', 'b', and 'c' to local variable a. Unlike in most other languages, the array base index is 1, so a\[1\] would yield the first element or 'a' in our example. Dictionary literal values can be written like this: ```lua local d = {['k1']='v1', ['k2']='v2'} ``` and indexed with square brackets such that d\['k2'\] would yield 'v2', for example. If the keys for a dictionary happen to be valid Lua names, the square brackets and quotes around the key strings can be omitted. For example, the above example could be simplified to: ```lua local d = {k1='v1', k2='v2'} ``` For such key values, it is also possible to access their values using member-name syntax. For example, d.k1 would yield 'v1', just as d\['k1'\] would. # Migrating from eScript to Lua Most of eScript has a direct equivalent in Lua. eScript has full support for a single numeric type (IEEE754 double precision float) and limited support for strings. As configured for the eGauge firmware, Lua has the same numeric type but also supports 32-bit integers and has full support for strings, boolean values, and tables. The most important differences between eScript and Lua are as follows: - In eScript, the value of a register is obtained with $"register\_name", whereas in Lua, the equivalent expression is \_\_r("register\_name"). - Lua boolean values cannot directly be used as numeric values, whereas eScript uses 0 to represent false and any non-zero value for true. - Lua does not provide a direct analog for the conditional operator ``` cond ? if_true_expr : if_false_expr ``` Instead, Lua uses the logical expression ```lua cond and if_true_expr or if_false_expr ``` This works quite similarly to the eScript conditional because of the way the and and or operators are defined. Specifically, and returns false if the left-hand side is nil or false or the right-hand side's value otherwise. Operator or returns the value of the left-hand side if it is not nil or false and the value of the right-hand side otherwise. Both operators short-circuit evaluation and operator and has higher precedence than or. - eScript automatically propagates NaN (Not-a-Number) values. For example, if any function is called with a NaN value, the returned result is also NaN. Similarly, if the condition of the conditional operator is NaN, then the result of the conditional expression is also NaN. Given the similarities between eScript and Lua, most eScript expressions trivially translate to Lua. The non-trivial translations are shown in the table below:Lua scripting is an advanced topic. eGauge Support has limited support for troubleshooting Lua scripts and cannot review Lua code.
Use caution and test extensively when using Lua scripts for automated control of remote devices to prevent unexpected operation or damage to connected equipment.
Use the latest firmware: Lua support was added in eGauge meter firmware version 4.1. However, bug fixes and new features this article refers to may have been added in newer firmware versions. Click here for information about checking and updating a meter's firmware.
### Introduction eGage meters have a Lua scripting environment that allows for creation of advanced formula register and alert functions, as well as automated control of supported devices such as the [eGauge PRM3 Power Relay Module](https://www.egauge.net/support/m/prm3). Refer to the [Lua Scripting Overview](https://kb.egauge.net/books/advanced-egauge-operation/page/lua-scripting-overview) article for a general Lua primer and additional modules provided by the eGauge firmware. ### Lua scripting interface [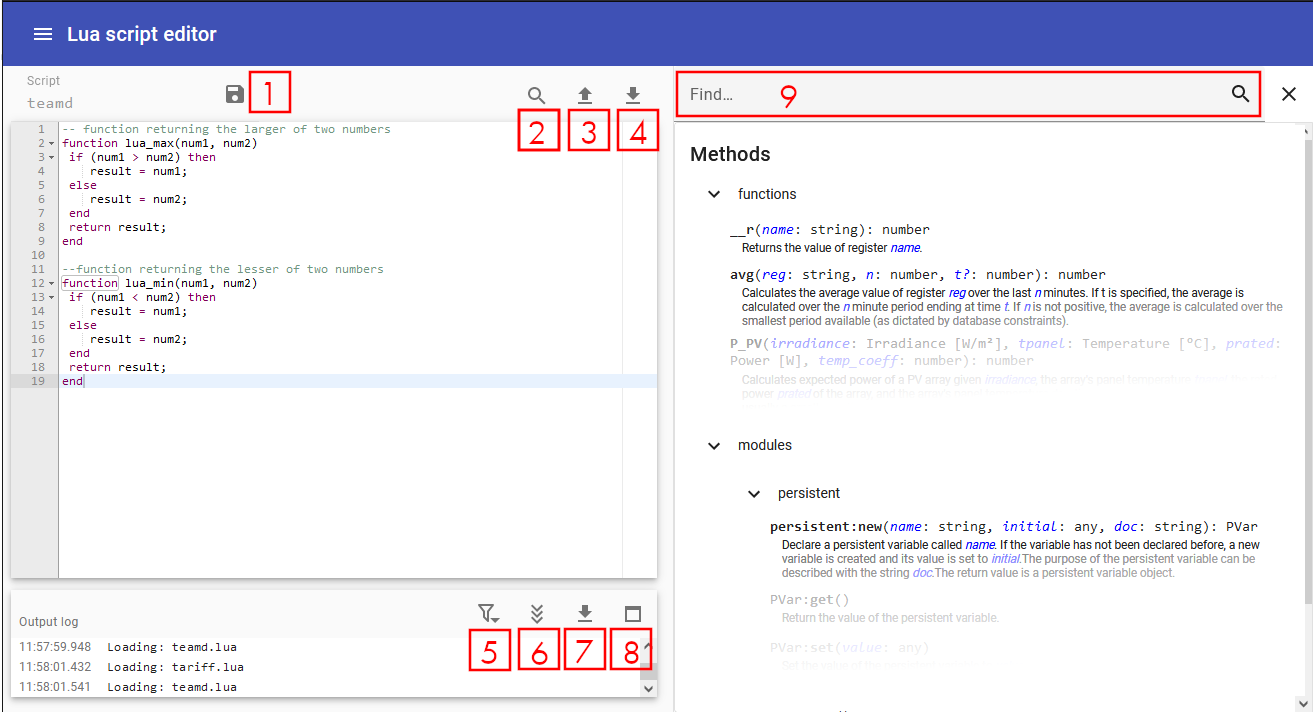](https://kb.egauge.net/uploads/images/gallery/2024-04/image-1714160404297.png) Several keyboard shortcuts are displayed when the interface is loaded: - `F1`: Open the keyboard shortcuts menu - `F2`: Toggle the sidebar on the right - `Ctrl-␣`: Toggle auto-complete - `Ctrl-,`: Open the GUI settings menu When using Mac, use the ⌘ key instead of Ctrl. The eGauge web interface has a built-in Lua script editor with 3 panes as shown in the above screenshot. - **Editor** (_top left_)— The Lua code editor. There are 4 buttons for this pane: - [1] Save: This saves the functions and makes them available for use by the meter. - [2] Search: This allows to search for and replace text in the code. - [3] Upload: This replaces the current script on the meter with a file upload. - [4] Download: This downloads the current script from the meter as a file - **Output log** (_bottom left_)— Below the editor, the Lua log is displayed. This will include any script errors or print statements. If there are no custom Lua functions for the script loaded, there may be an error such as "Lua error: cannot open xxx.lua: No such file or directory", and this error may be ignored. There are 4 buttons available for this pane: - [5] Filter: Apply a filter to only output log lines containing certain text - [6] Autoscroll: Toggles auto-scrolling to the most recent log output - [7] Download: Downloads the log file - [8] Maximize Window: Maximizes the log output window - **Sidebar** (_right_)— the sidebar on the right-hand side provides a method explorer to find and describe all available eGauge-provided functions and modules. The function or module may be clikced on to automatically insert it into the Editor pane to the left. The sidebar has a search bar [9] to conveniently search through methods, functions and documentation #### Accessing the Lua scripting environment 1. If using the classic interface, click on View → Modern user-interface: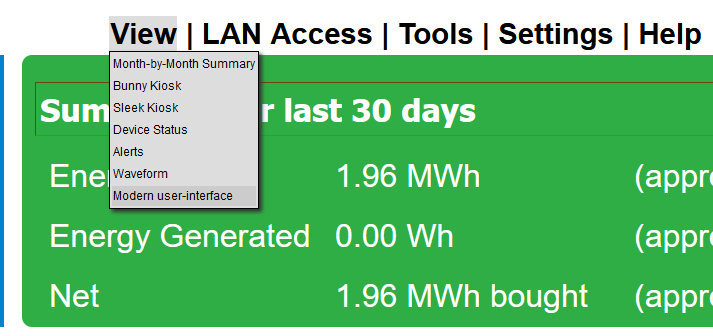
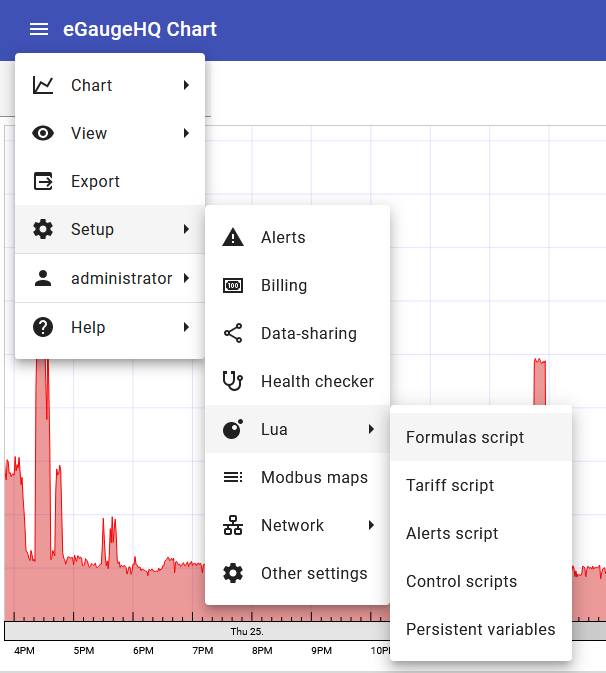
Formulas script (formula registers)
Creating lua functions in the Formulas script editor will allow the functions to be used in a formula register. For example, here are two functions made in the Lua Formulas script editor that will return the min or max of two numbers: ```lua -- function returning the larger of two numbers function lua_max(num1, num2) if (num1 > num2) then result = num1; else result = num2; end return result; end --function returning the lesser of two numbers function lua_min(num1, num2) if (num1 < num2) then result = num1; else result = num2; end return result; end ``` They may then be used in a formula register: [](https://kb.egauge.net/uploads/images/gallery/2023-02/image-1676407153301.png) And we may see the registers work as defined by the script functions: [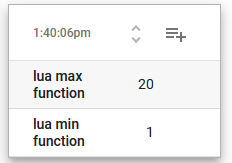](https://kb.egauge.net/uploads/images/gallery/2023-02/image-1676407218019.png)Tariff script (Advanced time-of-use and tiered billing)
Advanced time-of-use and tiered billing may be performed in this Lua scrript.A tariff script should provide (at least) a cost(register, negate, schedule) function which calculates the incremental cost based on the energy-use recorded by register. _negate_ can be set to true if the register's value counts down for power consumption. _schedule_ is optional and can be set to the (non-default) name of the schedule to use when calculating the cost. A formula register of type "monetary" would be used with the `cost()` function. For an example billing script, from the classic interface: 1. Navigate to Settings → Billing. 2. Choose Xcel Colorado as the tariff provider. 3. Click "OK" to save and go back to the main settings page. 4. Go back to Settings → Billing. 5. Change the tariff providert to "custom" 6. Click the "Customize tariff script" button, which will open a copy of the Xcel Colorado billing tariff in the Lua script editor.
Alert script
Alerts scripts work the same as Formula scripts, but are used in eGauge meter alerts, configured in Settings → Alerts.Control scripts
See the main Lua Scripting Overview Control Scripts section for additional Lua Control environment information.
There is risk of damaging external equipment using control scripts. Only skilled Lua developers familiar with the eGauge meter and software should attempt to use Lua control scripts.
Control scripts can be used to confrol supported equipment such as the eGauge Power Relay Module (PRM3). For example, the following script reads the instantaneous value of a register called "Temperature" and controls a PRM3 relay contact. If the temperature is lower than 21 C, relay number 0 of the PRM3 is closed (activated), otherwise opens (turns off) relay number 0. It then sleeps for 15 minutes before checking again. In the real world, the control script should be more advanceddev = ctrl:dev({interface='relay'})
relay = dev:interface('relay')
while true do
print("Temperature is currently: " .. __r("Temperature"))
if __r("Temperature") < 21 then
relay:close(0)
else
relay:open(0)
end
sleep(60*15)
endPersistent variables
See the main [Lua Scripting Overview](https://kb.egauge.net/link/321#bkmrk-module-persistent) section on Persistent variables. Persistent variables are variables that are preserved between reboots or power cycles. The following Formula script creates and updates a peristent variables with a given name and number passed to it in a formula register, and prints debug to the output log:function persistent_variable_example(name, number)
obj = persistent:new(name, number, "Variable stored by formula function persistent_variable_example")
current_value = obj:get()
print(name .. " currently has value " .. current_value)
print("updating " .. name .. "to new value " .. number)
obj:set(number)
end
Editing chart functions is an advanced feature which requires knowledge of JavaScript. eGauge support cannot assist in writing or debugging JavaScript code.
Chart functions allow for the use of JavaScript to calculate new values based on the data recorded in the registers in the meter configuration. ##### Creating or editing a Chart function The Chart Function editor can be accessed from the main menu by choosing *Chart → Edit functions* [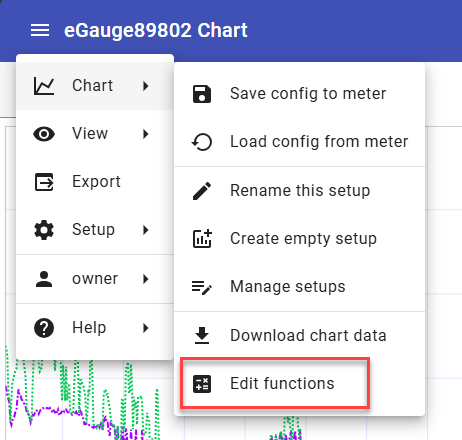](https://kb.egauge.net/uploads/images/gallery/2024-09/edit-functions.png) Click on an existing chart function to edit it or click on the *Add function* icon to add a new one. Click the **`X`** to delete an existing chart function: [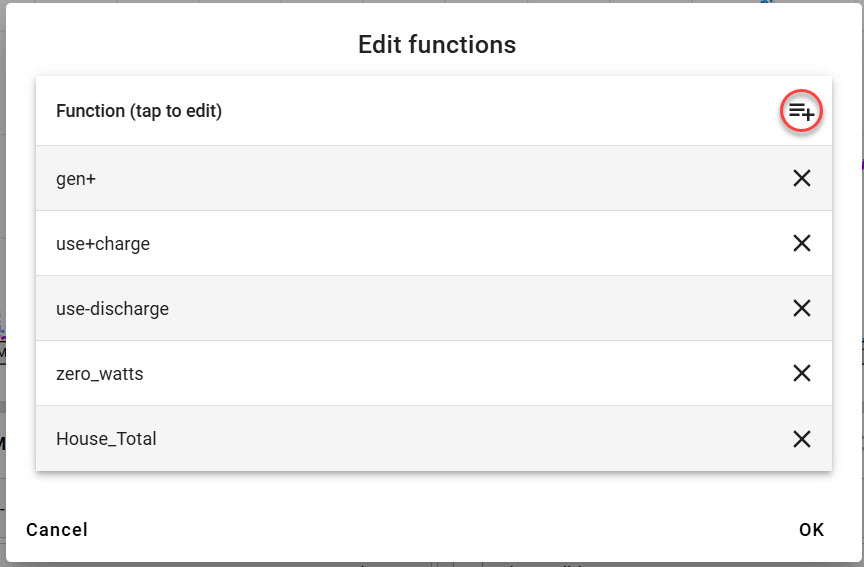](https://kb.egauge.net/uploads/images/gallery/2024-07/func-list.jpg) The Chart function editor is shown below with an example function: [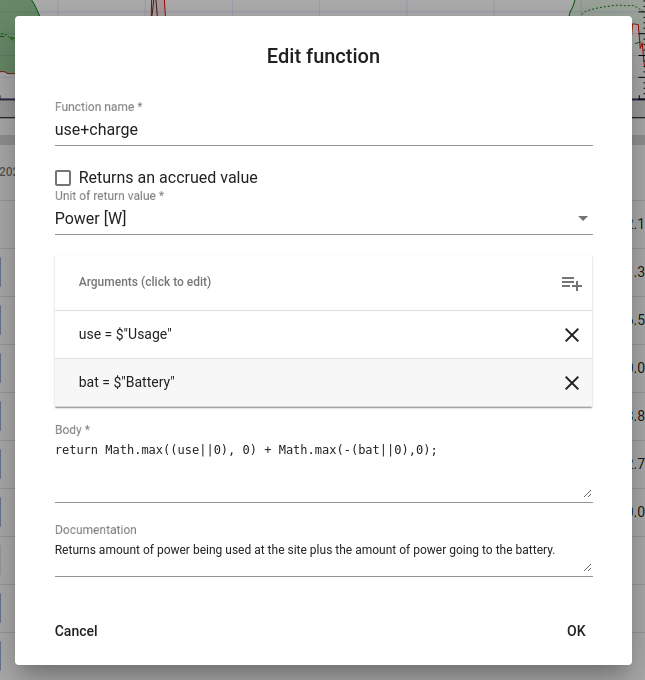](https://kb.egauge.net/uploads/images/gallery/2024-07/example-function.png) **Function name** - (mandatory field) An arbitrary, unique name selected by the user. This is only used within the eGauge chart and does not need to be a valid JavaScript function name. In the example script shown above, the Function name is *use+charge* **Returns an accrued value** - Enable this option to return an accrued (cumulative) value. Leave this option disabled to return an instantaneous value. **Unit of return value** - (mandatory field) Selects the unit the value returned by the function displays as. In the example script above, this is set to *Watts*. This value should be changed depending on the unit of the calculation being performed by the function. **Arguments** - This table defines the list of values to be passed to the function. Only register values can be passed as arguments. Argument names must be valid JavaScript identifiers. In the example script shown above there are two arguments defined. `use` which is being passed the instantaneous value of the eGauge **Usage** Virtual register (defined as *$"Usage"*) and `bat` which is being passed the instantaneous value of the "Battery" Virtual register (defined as *$"Battery"*). Both "Usage" and "Battery" are register values defined in the eGauge Installation settings (link) of the meter. **Body** - This section defines the calculations to be performed by the function. In the example above, the body calculates the sum of how much power is being used at the site plus how much power is going into the battery to charge it.If a function argument refers to a register that no longer exists in the meter configuration settings, its value will be *Undefined*. This is the reason for using "||0" in the code above: it ensures that if either the usage or battery virtual registers are undefined, a value of 0 is used instead.
Note that the body may be an arbitrary JavaScript function body and does allow for nested functions. Example: ```javascript function reg_or_zero(reg) { return reg || 0; } return reg_or_zero(use); ``` **Documentation** - A field for adding a description of what the function does Click 'OK' to save your chart function. ##### Graphing Chart functions Saved chart functions will appear in the list of values to graph after register values. To add a saved chart function to a chart, add a new chart item and choose the chart function from the list of items displayed in the *Value to Graph* dropdown list. The chart function will behave as any other chart item. [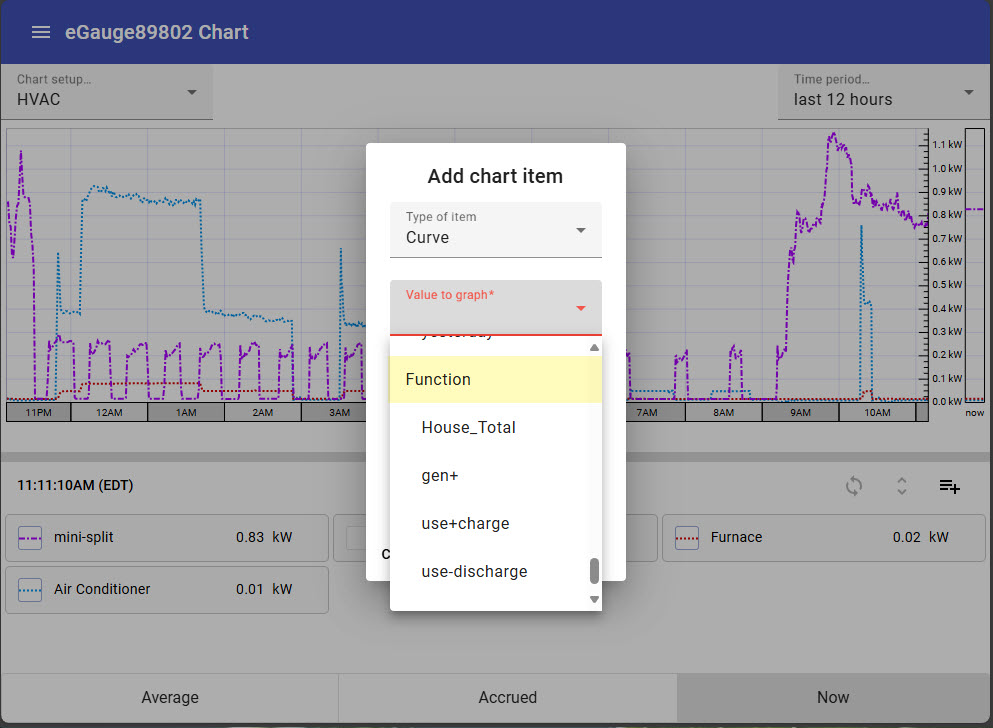](https://kb.egauge.net/uploads/images/gallery/2024-07/add-chart-item-func.jpg)