Firmware version 4.6 or newer is needed to set up eGauge device alerts in the Modern Interface. Please see this article for information on checking and upgrading your eGauge meter firmware.
To view and acknowledge triggered alerts, see the Alert Viewer article.
### eGauge device Alerts eGauge device Alerts allow the meter to log and send alerts that may be triggered off a variety of conditions, such as the meter's configuration being changed, a remote SunSpec device fault, or advanced custom alerts such as voltage being out of expected range. Alerts are displayed in the Modern Interface using the Alert Viewer, and may be configured to be sent via email or HTTP POST with JSON-formatted data. ### Accessing the Alert Setup To access the Alert Setup page, from the main menu access Setup → Alerts: [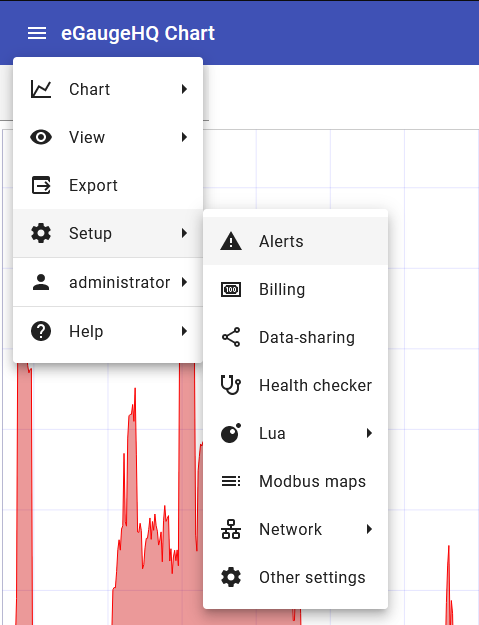](https://kb.egauge.net/uploads/images/gallery/2024-04/image-1714405213146.png) ### Setup sections There are 3 main sections to configure for alerts: [](https://kb.egauge.net/uploads/images/gallery/2024-04/image-1714405372455.png) - **Custom Alerts**: These are custom, user-specified alerts. For example, a custom alert may be configured to trigger if total usage averages over 50 kW for a period of 15 minutes. - **Alert delivery**: If emailing or sending alert data via HTTP POST, the destination and configuration may be set up here. - **System Alert Priorities**: There are a number of built-in system alerts including device configuration changes or device reboots. #### Custom Alerts The Custom Alerts allows users to set up flexible alerts based on register data and other functions provided by the eGauge firmware. For a full list of available alert functions, visit /fundoc.html?alert on the particular meter (e.g., [https://egaugehq.egauge.io/fundoc.html](https://egaugehq.egauge.io/fundoc.html?alert)).Be sure to save updated or new alerts by clicking "Save" in the lower right-hand corner of the page!
When editing an existing alert or creating a new alert, you may set information about the alert and the conditions required for it to trigger: [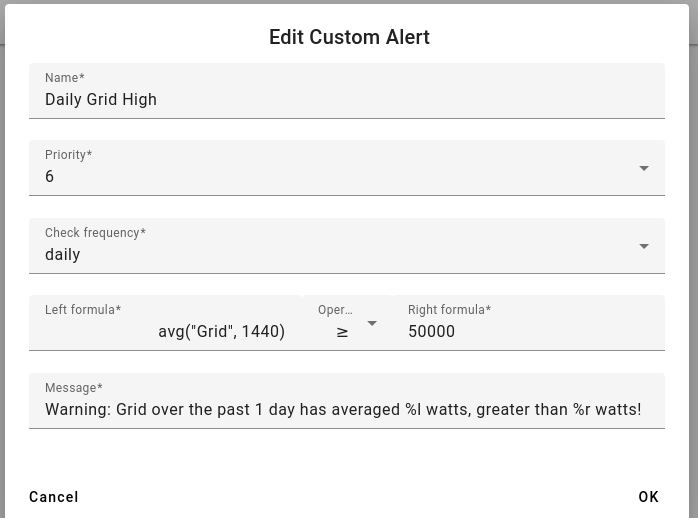](https://kb.egauge.net/uploads/images/gallery/2024-04/image-1714414726209.png) When creating or modifying an alert, there are 7 required fields to enter: - **Name**: The unique name for an alert - **Priority**: Priority level for the alert. For SMTP email alerts, once an alert-destination has been notified, only alerts of higher priority result in a new notification to that destination until the alert has been acknowledged or deleted via the alerts page. - **Check frequency**: How often to check the alert condition. Note, the interval frequency starts at the top of the interval. E.g., hourly is evaluated at the top of the hour, daily is evaluated at midnight, monthly at midnight on the first of the month, and so on. - **Left formula**: The left-hand side of the comparison formula. This may utilize register values, static numbers, and eGauge alert functions or custom Lua functions. - **Operator**: The operator to compare the left and right formulas. This may consist of: - **Less than (<)**: If the left formula is less than the right formula - **Less than or equal to (≤)**: If the left formula is less than or equal to the right formula - **Equals (=)**: If the left formula equals the right formula - **Not equals (≠)**: If the left formula does not equal the right formula - **Greater than (>)**: If the left formula is greater than the right formula - **Greater than or equal to (≥)**: If the left formula is greater than or equal to the right formula - **Right formula**: The right-hand side of the comparison formula. This may utilize register values, static numbers, and eGauge alert functions or custom Lua functions. - **Message**: The alert message that is displayed in the Alert Viewer details and any email alert messages. Several special variables may be used in the message: - `%l`: evaluated value of left formula - `%L`: formula of left formula condition - `%r`: evaluated value of right formula - `%R`: formula of right formula condition - `%o`: comparison operator of formula - `%%`: percentage characterValid SMTP credentials and server information is required for the email-direct method. Multi-factor authentication or other high-security network applications may prevent SMTP email alerts from functioning, so the eGuard Alert Service email method is recommended.
[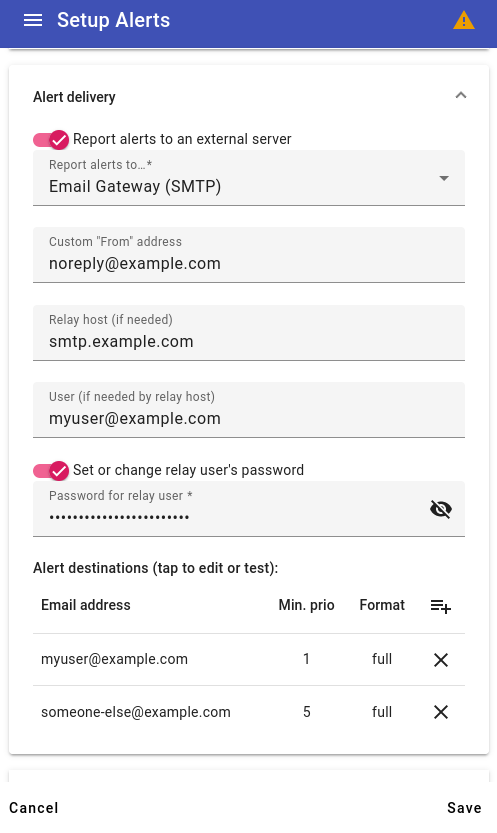](https://kb.egauge.net/uploads/images/gallery/2024-05/image-1715025110488.png) There are several options to configure: - **Custom "From" address**: The From address to send the email from. If omitted, the From address defaults to the "User" configured below. This may be required if the "User" below is not a fully qualified email address. - **Relay host**: The SMTP server to send the email through. If this is left blank, the eGauge will attempt to directly send the email to the alert destination's email domain. **Warning**: most email servers will reject emails sent directly without a relay host. - **User**: If a relay host is specified, this is the username that should be sent to the relay for authentication. Note: some servers require the full `email@domain` user format, while others may only require the `email` user format. - **Password**: If a relay user is specified, this is the password that should be used to authenticate. After configuring the server information, Alert destinations should be configured. Click on an existing destination to edit the information, or click the "Add" button in the upper right-hand corner of the table to add a new alert destination email. When configuring a destination email, there are 3 options to configure: [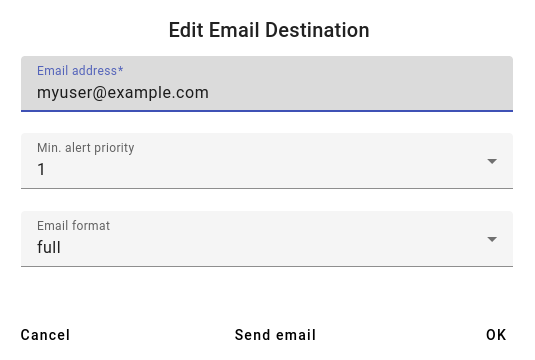](https://kb.egauge.net/uploads/images/gallery/2024-04/image-1714423531345.png) - **Email address**: The email address to send triggered alert information to. This may or may not be the same as the SMTP relay user information configured previously. - **Min. alert priority**: The minimum alert priority this destination should receive alerts for. For example, if all alerts are set to priority 0, an alert destination with a minimum alert priority of 1 will not receive any alert emails. - **Email format**: The length of the email to send to the destination. The "full" format provides a fully detailed alert email, while "short" only provides the highest-priority limit to stay within 140 characters, such as for use with email-to-SMS gateway addresses. A "Send email" button allows the testing of an outbound email to that particular email destination. If successful, the destination email will receive a test email from the meter. **Warning**: if no Relay Host and credentials are configured, outbound emails may not work all the time, even if an initial "Send email" test is successful.System alerts are always logged and can be viewed in the Alerts View. Priorities may only need to be changed if alerts are being sent to an external server configured in the Alert Delivery section.
There are a number of built-in system alerts including device configuration changes or device reboots. In this section, the priority level of each system alert may be configured. For example, a user may have an unstable internet connection and may not want to be alerted whenever the proxy-connection is lost or re-established, but may want to be alerted about a remote device fault. In this case, the "Remote device fault" may be set at priority 1, while "Proxy-connection established" and "Proxy-connection lost" are set to priority 0. The alert destination, if set to a minimum priority level 1 will receive alerts for the remote device fault, but not for proxy-connection events. ### Custom AlertsFor a full list of available alert functions, visit /fundoc.html?alert on the particular meter (e.g., https://egaugehq.egauge.io/fundoc.html).
eGauge Support has limited support for creating and troubleshooting custom alerts.
##### General Syntax Custom alert formulas follow a logical expression format. `$"REG NAME"` returns the instantaneous value of the register `REG NAME`, while `"REG NAME"` points a function at a specific register (but doesn't return the register's value). When using functions such as `avg()` or others listed in the function documentation, be sure to use the correct format. E.g., a function expecting a "string" will expect a quoted register name (e.g., `"REG NAME"`) while a function expecting a number (instantaneous register value) will expect the register's current value (e.g., `$"REG NAME"`, with the prefixed `$`). Generic syntax examples:| Expression | Description |
|---|---|
| 3+4*5 | Equals 23 |
| (3+4)*5 | Equals 35 |
| sqrt(9) | The square-root of 9 (i.e., 3) |
| $"Grid" | The instantaneous value of register Grid (e.g., 500 W) |
| (3>4) ? 3.14 : 10 | Conditional expression evaluating to 10 (as 3>4 is false) |
If delivering email to only one recipient, consider using the [eGuard Alert Service](https://kb.egauge.net/link/217#bkmrk-eguard-alert-service) to send device alerts as it is the easiest method for delivering email alerts.
You will need your own website's email address to send email from; Gmail, Yahoo, AOL and other public email services may not work with this method.
Compatibility Notice: Beginning in June 2023, only EG4xxx will be compatible with the SendGrid SMTP gateway. Legacy meters such as EG30xx and eGauge2 will fail to send alerts via the SendGrid SMTP gateway.
SendGrid is a free third party service unaffiliated with eGauge which provides a consistent outbound email delivery service. It can be used for eGauge alert delivery, and is more reliable than not specifying an "Email Gateway". Without an "Email Gateway" configured, alert emails may be rejected, dropped, or fail inconsistently. It is intended as a commercial service for businesses rather than individual end users. SendGrid allows **up to 100 emails daily** with the **free plan**. SendGrid provides delivery information and monitoring such as email delivery failures, number of emails sent and other features. # Disclaimer SendGrid is a third party email delivery service with no affiliation with eGauge Systems. eGauge Systems cannot guarantee email delivery, uptime, or security of using SendGrid. Information on this page will be updated on best effort level. Information including pricing, set up instructions, screenshots, and locations of items are not guaranteed to be up to date or consistent. eGauge Systems does not provide any support for SendGrid's services, and cannot assist with account creation, password recovery, or similar issues. # Pre-setup notes[Ensure the eGauge meter used is on firmware v4.0 or greater, click here for information on checking and upgrading firmware](https://kb.egauge.net/books/egauge-meter-ui/page/checking-and-upgrading-firmware).
Email can be delivered from the eGauge meter using SMTP server `smtp.sendgrid.com` and a sendgrid API key. If using alerts on multiple devices, it is advised to set up a unique API key for each one, so that if the key becomes compromised or the meter becomes inaccessible and alerts cannot be disabled, the API key can be revoked for only that meter. API keys are passwords and are displayed only once after creation. # Setup 1. Set up API keys: [Initial account creation and setup wizard for first email](#wizard) **or** [Adding a second API key, or adding without the wizard from the main dashboard](#manual) 2. [Verify a sender identity](#bkmrk-verify-sender-identi) 3. [Configure the eGauge meter](#bkmrk-configure-the-egauge) ## Initial account creation and setup wizard for first email 1. Create an account at [https://sendgrid.com/](https://sendgrid.com/) 2. Click "Start" to the right of "Integrate using our Web API or SMTP relay" 3. In "Choose a setup method", choose "SMTP relay"  4. Give the API key a name, like "eGauge Alerts Emails" and press "Create Key"  5. You will now be given the SMTP server (smtp.sendgrid.net), the username (apikey), and password (hidden). This is the only time the password will be displayed, it should be saved somewhere securely like an encrypted keychain if it will be used more than once. Keep this page open or copy the password as it will be used in a later step.  --- ## Adding a second API key, or adding without the wizard from the main dashboard 1. In the main dashboard on the left-side menubar, expand Settings and click API keys. [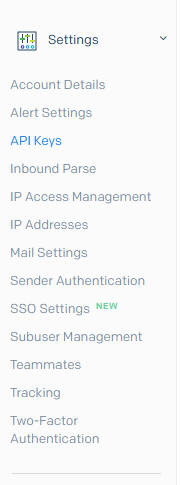](https://kb.egauge.net/uploads/images/gallery/2022-07/image-1657573543458.png) 2. Click "Create API Key" in the upper right-hand corner: [](https://kb.egauge.net/uploads/images/gallery/2022-07/image-1657573663515.png) 3. Choose "Restricted Access" as the API key permissions, expand the "Mail Send" section, and click the dot on the right side of the bar next to "Mail Send" to grant that permission  4. Click "Create and View", and copy the API key displayed on the next screen. This will be used to configure the eGauge meter in a later step.  ## Verify Sender Identity You will need to set up Sender Authentication so the receiving email server trusts and accepts the email the eGauge meter delivers. Follow the instructions for [Single Sender Authentication](https://docs.sendgrid.com/ui/sending-email/sender-verification) (simple: sends an email link to verify email address) or [Domain Authentication](https://docs.sendgrid.com/ui/account-and-settings/how-to-set-up-domain-authentication) (advanced: requires modifying DNS entries on your website). Without sender authentication, you will see an error such as `The from address does not match a verified Sender Identity` when sending a test email without verification completed. It will contain a link with information to set up sender authentication. The email address you verify will be used in the `Custom "From" address` setting in the eGauge meter alert settings. ## Configure the eGauge Meter 1. Navigate to Settings -> Alerts, ensure "Alert Provider" is set to "SMTP Gateway" and click on "View/Edit Gateway & Alert Destinations". Enter the mail server hostname (`smtp.sendgrid.com`), username (`apikey`), and the API key / password that was created previously. For the Custom "From" Address, enter an email identity verified in the previous step. [](https://kb.egauge.net/uploads/images/gallery/2022-07/image-1657575198734.png) 2. Enter the email address(es) that should receive alerts from the meter under Alert Destinations. [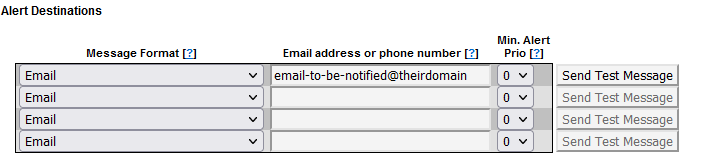](https://kb.egauge.net/uploads/images/gallery/2022-07/image-1657575742987.png) 3. Press "Save" at the bottom of the page, and then "Send Test Message" to the right of each Alert Destination to ensure the delivery works.  # Configuring eGauge Alerts (Classic Interface method)Firmware version 4.6 and newer can have alerts [configured through the Modern Interface.](https://kb.egauge.net/books/advanced-egauge-operation/page/configuring-egauge-alerts-classic-interface-method-modern-interface-method)
### Overview The eGauge can be configured to send alerts based on a variety of trigger conditions. Alerts must be configured through the eGauge interface, and the eGauge needs to be powered on and connected to the internet in order to send alerts. There are three possible alert destinations: SMTP (email or SMS-capable phone numbers via an email-to-SMS gateway if the cellular provider supports), the eGuard alert service, or a custom URI for a JSON POST (advanced users). SMTP emails credentials may be supplied, and the eGauge will use this email account to generate alerts. Some services such as Gmail may restrict logins to browsers, or disallow the login if devices in different locations are attempting to all log in to send alerts. For large larger deployments a [service such as SendGrid](https://kb.egauge.net/books/advanced-egauge-operation/page/alerts-and-email-gateway-with-sendgrid) may be used. The [eGuard Alert Service](https://kb.egauge.net/link/217#bkmrk-eguard-alert-service) is a more simplified email alert delivery service and only requires you have an eGauge.net account. The following article covers basic alert configuration and provides some sample alerts. Additional information is available on an eGauge-specific basis by navigating to http://**DEVNAME**.egaug.es/fundoc.html?alert where **DEVNAME** is the [device name](https://kb.egauge.net/books/general/page/where-can-i-find-my-device-name "Where can I find my device name?") of your specific eGauge. To take advantage of all alert features, the eGauge should be on the [latest firmware](https://www.egauge.net/revs/).For meters shipped after January 1, 2024 this information may be found at: http://**DEVNAME**.egauge.io/fundoc.html?alert
### Contents [Alert Basics](#bkmrk-alert-basics) [Configuring the Alert Service Provider](#bkmrk-configuring-the-aler-0) [SMTP Gateway](#bkmrk-smtp-gateway) [Using SendGrid](#bkmrk-using-sendgrid) [eGuard Alert Service](#bkmrk-eguard-alert-service) [Custom Alert Destinations](#bkmrk-custom-alert-destina) [Configuring Alerts](#bkmrk-configuring-alerts-0) [System Alerts](#bkmrk-system-alerts) [User Defined Alerts](#bkmrk-user-defined-alerts) [Viewing and Acknowledging Alerts](#bkmrk-viewing-and-acknowle-0) [User-defined Alert Examples](#bkmrk-user-defined-alert-e-0) [Example and description of POST data](#bkmrk-example-and-descript-0) ### Alert Basics Alerts may be configured from the **Settings → Alerts** page and viewed from **View → Alerts**. There are two types of alerts: system alerts and user-defined alerts. System alerts can report conditions such as when the device configuration is changed or when the connection to a remote device has been established. User-defined alerts are built arbitrary conditions that, when true, trigger the alert. For example, you could define an alert that triggers when solar production for a period is below a certain threshold value, or an alert that triggers when the register monitoring Oven usage has been above a certain value for a certain time. More examples are **available here**. ### Configuring the Alert Service Provider Choose the View/Edit Gateway & Alert Destinations button from the top of the Alerts page to configure how alerts are sent. The page will request credentials in order to make changes if none have been previously cached. ##### SMTP GatewayLegacy meters (eGauge2 and EG30xx series) support TLS 1.1, while newer meters (such as EG4xxx) support TLS 1.2.
[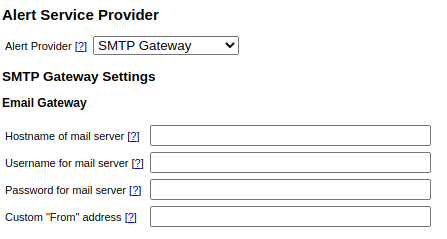](https://kb.egauge.net/uploads/images/gallery/2020-08/image-1598029453892.png) The SMTP Gateway Alert Service Provider allows the eGauge to send alerts directly to email addresses, SMS-enabled phones, or a mixture of the two. This functionality requires an internet connection, but *does not* require the eGauge to be connected to the proxy server at d.egauge.net. The following fields are required: **Hostname of mail server** Normally, eGauge attempts to deliver email directly to the destination address. Similarly, it attempts to deliver SMS directly to an SMS-gateway. However, if a firewall prevents the device from directly establishing such connections, as is commonly the case for consumer-grade Internet-service, you will have to set the value of this setting to the hostname of a mail server which can forward the messages to the final destination. The mail server may either be a host on the same LAN (e.g., within a company or school network) that will accept email delivery without authentication or it may be am external mail server where you have a valid user account. By specifying the username and password for that account, the device is then able to deliver email through that mail server (ie, the alert messages from the eGauge will originate from your username on that mail server). As an example, if you have a Gmail account, you can set the hostname to smtp.gmail.com. By specifying your Google account’s username and password, you can then have alerts delivered via Gmail. **Username for mail server** When non-empty, this setting specifies the username the device uses to authenticate itself to the mail server. If empty, mail is delivered without authentication. Note that this option is required for almost all mail servers. **Password for mail server** This setting specifies the password the device uses to authenticate itself to the mail server. It is used only if Username is not empty.Caution: on legacy meters (eGauge2 and EG30xx series) the password is transmitted to the eGauge over an unencrypted channel. Only change this password from a computer that’s connected to the same LAN as the eGauge and only after clicking on the **LAN Access** link on the eGauge main page. As an added security measure, create a dedicate email account at the mail server for sending eGauge alerts.
##### Using SendGridCompatibility Notice: Beginning in June 2023, only EG4xxx will be compatible with the SendGrid SMTP gateway. Legacy meters such as EG30xx and eGauge2 will fail to send alerts via the SendGrid SMTP gateway.
SendGrid credentials are entered in the SMTP Alert Service Provider fields. For more information on using SendGrid or a similar service, please refer to [this article](https://kb.egauge.net/books/advanced-egauge-operation/page/alerts-and-email-gateway-with-sendgrid). ##### Setting Alert Destinations [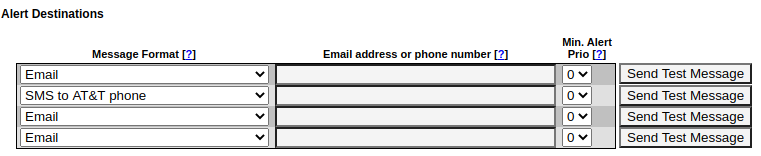](https://kb.egauge.net/uploads/images/gallery/2020-08/image-1598030888514.png) Message Format: select the appropriate SMS carrier or email format. Email address or phone number: enter the appropriate destination for the alert. Min. Alert Prio (Minimum Alert Priority): minimum level of alerts this destination should receive (see below). Up to four alert-destinations can be defined. Alerts are prioritized. For each alert-destination, a **minimum priority** can be defined. Only alerts whose priority is equal to or greater than the minimum priority are reported to an alert-destination. Once an alert-destination has been notified, only alerts of higher priority result in a new notification to that destination until the alert has been acknowledged or deleted via the alerts page, or after 24 hours have passed. ##### eGuard Alert ServiceLegacy meters (eGauge2 and EG30xx) require **[HTTPS certificate validation to be disabled](https://kb.egauge.net/link/369#bkmrk-disabling-certificat)** to activate the eGuard Alert Service. This is due to a bug with an older SSL library used on legacy meters and the eGauge.net certificate provider. This should only be used if the alert information being sent is not sensitive.
[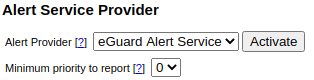](https://kb.egauge.net/uploads/images/gallery/2020-08/image-1598030496087.png) The eGuard alert service provides an alternative to configuring the eGauge with SMTP credentials. This is especially useful for users with a large number of devices. The meter must be in an eGuard group controlled by the user. More information on eGuard is [available here](https://kb.egauge.net/books/eguard-porfolio-manager/page/eguard-overview). Also note that eGuard features built-in alerts - those are covered in [this article](https://kb.egauge.net/books/eguard-porfolio-manager/page/eguard-alerts). To use the eGuard Alert Service, simply select "eGuard Alert Service" and click the "Activate" button. A new window will open, and you will be prompted to log in to eGuard. Once logged in (or if you are already logged in), eGuard will confirm you want to register this device for alerts. Click "Register for Alerts" to confirm. [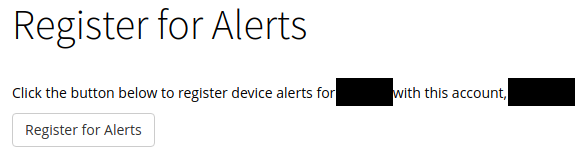](https://kb.egauge.net/uploads/images/gallery/2020-08/image-1598030729373.png) **Minimum priority to report:** Setting this to a value other than zero will omit any alerts with a priority set lower than that value. This can be useful when certain alerts are not required (eg, set all system alerts to zero, set minimum priority to report to 1, then set all user-defined alerts to 1). ##### Custom Alert Destinations [](https://kb.egauge.net/uploads/images/gallery/2020-08/image-1598031072095.png) Custom alerts may be utilized by advanced users to send JSON-formatted data as a POST to a user-provided URI (alert destination). **Alert Provider**: Must be set to "custom". **URI**: The URI to send the JSON POST to. Should be unique to the device, such as with a GET token to uniquely identify the device making the POST. **Options**: A comma separated list of options available below: - deflate: Use "deflate" content-encoding when posting alerts. - gzip: Use "gzip" content-encoding when posting alerts. - secure: For HTTPS connections, fail if the alert provider server's certificate cannot be verified as being valid.Do not use multiple compression schema, i.e., do not use gzip AND deflate on the same device.
**Minimum priority to report**: All alerts with a priority level equal to or greater than this will be POSTed to the URI when triggered. To prevent some or all system alerts from being reported, this may be set to "1" or greater. When alerts below the minimum priority level are triggered, they are only logged on the device locally and do not create a POST.An example of the JSON post contents is [available here](#bkmrk-example-and-descript).
### Configuring Alerts Alerts are reported with a delay of approximately 30 seconds and are automatically acknowledged 24 hours after reporting them. These rules ensure you will be promptly informed of any alert conditions for a device without a deluge of SMS or email messages. Alerts of higher priority are reported even if there are pending alerts of a lower priority. There are two types of alerts: System alerts and User-defined alerts ##### System Alerts System alerts are predefined but you can choose the priority with which they are reported. This allows control over which recipients receives which system alerts (if any) and which alerts are more important. To set an alert priority, use the dropdowns in the "Prio" column. If there are certain system-alerts that you do not wish to have reported at all, select priority 0 and ensure that all alert destinations have a minimum alert priority of at least 1. Note that alerts with a priority of 0 will still be logged on the Alerts page, but no notifications will be sent for those alerts if all alert destination priorities are higher than 1. [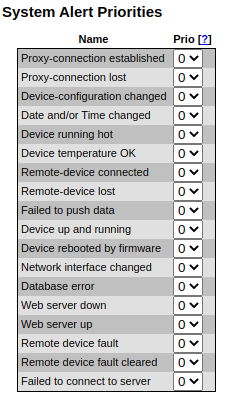](https://kb.egauge.net/uploads/images/gallery/2020-08/image-1598035794750.png) Proxy-connection established/lost: tracks when a connection to the proxy server at d.egauge.net is opened or closed. If this occurs frequently it can indicate an unstable network connection. Device-configuration changed: reports when a device’s configuration is changed, and which account has made the modification. Date and/or Time changed: reports when the device date or time is changed (either by the user or automatically). Device running hot: reports if the eGauge’s internal temperature reaches a significantly high temperature. Device temperature OK: reports when the eGauge’s temperature returns to a safe level. Remote-device connected: tracks when a connection is established to a remote device (including Modbus devices and remote eGauges). Remote-device lost: tracks when a connection to a remote device is lost (including Modbus devices and remote eGauges). Failed to push data: reports if a data push is set, and the eGauge is unable to successfully push data. Device up and running/Device rebooted by firmware: tracks when the meter is rebooted, and when the meter comes back online from a reboot or power outage. Network interface changed: tracks when the meter switches from an Ethernet (ETH) to HomePlug (PLC) connection. This may happen immediately after a reboot and can generally be ignored. Database error: typically reports when the device configuration is changed. The occasional database error is considered normal, but if this alert triggers multiple times per day and no configuration changes are being made it may indicate an issue. If this happens, contact eGauge support atChoose the lowest check frequency possible as evaluating too many conditions too often may slow down the device. If a slow-running condition (eg, a condition using the peak\_risk() function) is evaluated, evaluation of other conditions may be delayed until the evaluation of that condition is completed.
**Msg (Message):** use this field to define a custom-message to be displayed along with the alert name. If left empty, a default message is included which shows the value of the lhs, the operator, and the rhs of the trigger-condition. A well-written message will explain the alert - for example, on a "Low Production" alert the message might be "Caution: Low production on Inverter 1 (north side)". The placeholders `%l` and `%r` can be used in the message field to include the calculated value for the lhs and rhs of the equation.Examples of user-defined alerts are available in the [User-defined Alert Examples](#h_98585608921598384978268) section near the end of this document. Click [here](#h_98585608921598384978268) to jump to that section.
### Viewing and Acknowledging Alerts You can view and acknowledge alerts on your device under **View → Alerts**. By default, a list of triggered alerts will be visible. For more information on each alert and the option to acknowledge or delete an alert, click the "View Privileged Details" button. [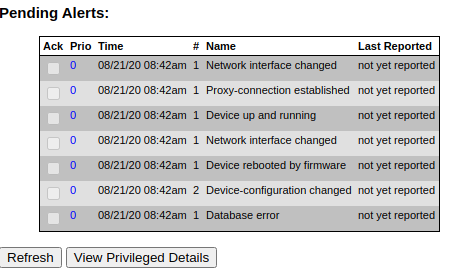](https://kb.egauge.net/uploads/images/gallery/2020-08/image-1598384378068.png) **Ack (Acknowledged):** indicates if this alert has been acknowledged. Once acknowledged, the alert will be reported again should it reoccur and its priority is sufficiently high. Alerts are automatically acknowledged after 24 hours. To ensure new alerts are reported, alerts should be acknowledged when they are received. **Prio (Priority):** the priority of the corresponding alert. **Time:** date and time of the most recent occurrence of the alert. **\#:** number of times this alert has occurred (note that this isn't necessarily the number of times the alert has occurred since the device was installed). **Name:** name of the alert. **Last Reported:** date and time when the alert was last reported to at least one of the alert-destinations. To view detailed alert information as well as acknowledge and delete reported alerts, click the "View Privileged Details" button. Valid credentials are required to see this information and acknowledge/delete alerts. [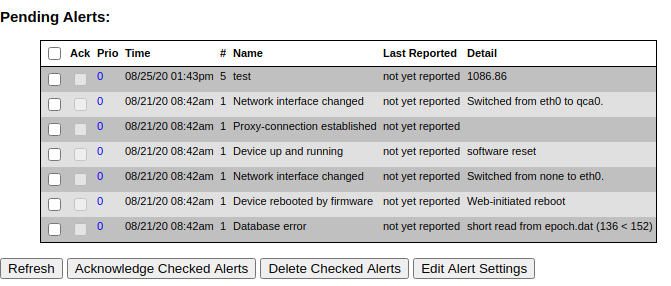](https://kb.egauge.net/uploads/images/gallery/2020-08/image-1598384643646.png) The **Detail** column contains additional information about each alert. For example, one instance of the "Network interface changed" alert provides the additional detail that the network interface was changed from "none" to "eth0" (this happens immediately after a reboot) while the other (newer) instance of the "Network interface changed" alert provides the additional detail that the network interface changed from eth0 to qca0. This happened very quickly (within the same minute), and is normal behavior for a meter coming back online after a reboot. To modify alerts, check off any alerts you wish to delete or acknowledge, and click the appropriate button. Deleting alerts here will remove them from the reported alert page until it occurs again. ### User-defined Alert ExamplesFor available functions on your particular firmware version, visit http://**DEVNAME**/fundoc.html?alert where DEVNAME is your eGauge [device name](https://kb.egauge.net/books/general/page/where-can-i-find-my-device-name "Where can I find my device name?").
##### General Notes `$"REG NAME"` returns the instantaneous value of the register REG NAME, while `"REG NAME"` points a function at a specific register (but doesn't necessarily return the register's value). When using functions such as avg() or others listed in the function documentation, **do not** include the dollar sign. When creating a message (Msg), there are several shortcuts which can be used to include values from the alert condition itself: `%l` will return the value of the left–hand–side `%L `will return the formula of the left–hand–side `%r` will return the value of the right–hand–side `%R` will return the formula of the right–hand–side `%%` will return a single percent sign (eg, %l %% would read as <value from left side of the comparison> %) ##### Basic Examples In the following example, "Grid Average" will return the daily average of the Grid register if that value is less than or equal to 5000W, while "Grid Instantaneous Usage" will return the instantaneous reading of the Grid register if that value is less than or equal to 1000W. [](https://kb.egauge.net/uploads/images/gallery/2020-08/image-1598385221466.png) The next example will trigger if the value of the L1 voltage register is greater than or equal to 130V (which could indicate a dangerous condition for devices connected to that service). [](https://kb.egauge.net/uploads/images/gallery/2020-08/image-1598388200742.png) More complex math can also be performed on either side of the alert expression. For example, the following alert obtains the average voltage from two references, and triggers if that value is greater than or equal to 130V. [](https://kb.egauge.net/uploads/images/gallery/2020-08/image-1598388449822.png) It's also possible to calculate cumulative values (kWh) over a period and trigger an alert based on those values. In the following example, let's assume an outdoor hot tub has a 6kW pump/heater, which cycles every 3 hours for 30 minutes at a time. Thus, every 6 hours there should be 6 kWh of energy used. Any less could indicate a pump or heater failure, and the hot tub could freeze. `(avg("Hot Tub Pump/Heat",360)*6) / 1000` will take the average power (W) read on the register Hot Tub Pump/Heat over the last 360 minutes (60 minutes in an hour, 6 hours). Then, the average power is multiplied by 6 hours to get Wh, the total energy used over the 6 hour period. Finally, we divide by 1000 to convert Wh to kWh. That value is then compared to the value on the right-hand-side, in this case 6. If the alert is triggered the alert will be sent. [](https://kb.egauge.net/uploads/images/gallery/2022-03/image-1646775756987.png) ##### Ternary operator The syntax of the “?” ternary operator (also referred to as a conditional or conditional test) is `condition?value_if_true:value_if_false` and can be nested. This is a fundamental component of many alerts, especially more complex alerts. ##### Boolean expressions Simple boolean expressions may be used within an alert: `(5 > 4)` will return 1. Conversely, `(5 < 4)` will return 0. The boolean value can be multiplied by another value (including a register value). For example, `($"Grid" < 7000) * $"Grid"` returns the value of “Grid” if “Grid” is greater than 7000 W, and returns 0 if the value of "Grid" is less than 7000W. To break this down: if `$"Grid" < 7000` is true, it will return a 1. `1 * $"Grid"` returns the value for the "Grid" register. If `$"Grid" < 7000` is false, it will return a 0. `0 * $"Grid"` is 0. Remember, `$"REGNAME"` returns the instantaneous value of the register. Let's look at how the `time()` function can be used with the ternary operator and boolean expressions to trigger an alert at a specific time: [](https://kb.egauge.net/uploads/images/gallery/2020-08/image-1598387960751.png) These two alerts work together to trigger if the Grid value is greater than 5000W during daytime hours and greater than 3000 during nighttime hours. time() returns the current time as a number from 0 up to (but not including) 24 with minutes as a fractional value. For example, 11:30am would be 11.5. We use two booleans here: `time() > 8 * time() < 18` If the time is > 8 (8am) and less than 18 (6pm), the booleans work out to 1 \* 1 or 1. If either boolean is false, the output from the booleans is 0. 0 \* 1 or 1 \* 0 both equal 0. This gives us a ternary expression of either `1 ? $"Grid" : 0` or `0 ? $"Grid" : 0` (remember ternary expressions work out as `condition?value_if_true:value_if_false`). Thus, if the booleans evaluate to 1, the left side of the formula returns the value of $"Grid". If the booleans evaluate to 0, the left side of the formula returns 0. Moving on to the alert expression: if the booleans work out to zero (ie, if the time range is not correct), the left side of the alert returns 0. This can never be greater than 5000, so the alert never triggers. If the booleans work out to 1, the left side of the alert returns the value of the "Grid" register. If the value of the "Grid" register is >= 5000, the alert triggers. ## Example and description of POST data `{{@425}}` # Example and description of JSON alert POST data ``` { "now": "1568419537.35", "alerts": [ { "id": 1804290019, "priority": 7, "occurrences": 12, "first_occurence": 4462.5, "last_occurence": 389.31, "name": "Device-configuration changed", "detail": "By owner." }, { "id": 1804290035, "priority": 0, "occurrences": 1, "first_occurence": 0, "last_occurence": 0, "name": "Device rebooted by firmware", "detail": "Howdy do?" } ] } ``` - `now` is a 64-bit UNIX timestamp, possibly with a fractional (sub-second) part, formatted as a decimal integer string. - `alerts` is a list of reported alerts: - `id` is a number that uniquely identifies an alert. It is used, for example, to acknowledge or clear an alert. - `priority` is the user-assigned priority level of the alert (0 being the lowest priority and 7 the highest priority). - `occurrences` gives a count of how many times the alert has occurred since it was last cleared. - `first_occurence` and `last_occurence` specify how many seconds ago the alert occurred for the first time and the last time, respectively, relative to `now`. That is, the specified number should be subtracted from `now` to get the absolute UNIX timestamp of when the alert occurred first and last, respectively. - `name` is the name of the alert that occurred. - `detail` provides additional detail on the alert that occurred.